
Jeremy Davis
Sitecore, C# and web development
NuGet is a really useful tool for managing external references for your .Net projects. It's also a tool that the Sitecore community are making good use of, with loads of useful Sitecore extensions available as packages. Plus it's been extended with the ability to deploy things into a Sitecore instance. Another potential use in Sitecore projects (that I've not found much discussion of) is for your references to the Sitecore DLLs themselves. I've been experimenting with this on some of my projects, so thought I'd write down what I've tried.
NB: While this is a useful technique to use inside your organisation, I'm pretty confident that you would get into trouble if you were to publish packages like these to a public NuGet feed. IANAL, but it looks like a breach of your license terms to me.
That aside, what do you have to do in order to use NuGet to manage your references to Sitecore DLLs?
 url copied!
The core Sitecore developer references:
These DLLs are the most common ones that I find myself referencing when writing code for public sites. (SC 6.6 using ASP.Net – if you're working with 7.x and/or MVC you will probably adjust this to match your approach) You'd probably reference this package in all your projects.
The Sitecore UI references:
These DLLs are the ones you're most likely to use when you're customising the editorial UIs. You won't reference these DLLs as often – hence splitting them out.
url copied!
I have created a
.nuspec
file for each release of Sitecore I need to support. (So 6.4, 6.5, 6.6 etc - the update releases to each of those versions are handled by the package version) As an example, here is a possible package definition for a specific release of Sitecore 6.6:
<?xml version="1.0" encoding="utf-8"?>
<package xmlns="http://schemas.microsoft.com/packaging/2011/08/nuspec.xsd">
  <metadata>
    <id>Sitecore-6.6</id>
    <version>0.130404.4</version>
    <title>Sitecore developer references for v6.6</title>
    <authors>Jeremy Davis</authors>
    <owners>Sitecore</owners>
    <iconUrl>file:\\myInternalServer.com\common\NuGetRepository\sitecore.png</iconUrl>
    <requireLicenseAcceptance>false</requireLicenseAcceptance>
    <description>Contains the core references for Sitecore, Json and Lucene</description>
    <references>
      <reference file="Sitecore.Kernel.dll" />
      <reference file="Sitecore.Analytics.dll" />
      <reference file="Lucene.Net.dll" />
      <reference file="NewtonSoft.Json.dll"/>
    </references>
  </metadata>
  <files>
    <file src="lib-6.6\Sitecore.Kernel.dll" target="lib\" />
    <file src="lib-6.6\Sitecore.Analytics.dll" target="lib\" />
    <file src="lib-6.6\Lucene.Net.dll" target="lib\" />
    <file src="lib-6.6\NewtonSoft.Json.dll" target="lib\" />
  </files>
</package>
It consists of two sections – one for metadata and one for the things to deploy.
The
id
element defines the unique identifier for this package. It can be anything you want, but I have been naming these for the version of Sitecore that the package points to. The
version
element needs to change every time you renew the package if you want your web projects to be updated easily. Again this can be anything you like, but I have chosen to use the remainder of the Sitecore version number (including the build) and add an extra number to the end to allow me to have a version number for the package.
The
title,
author,
owners
and
description
elements can be set with whatever you feel is appropriate for your packages. These are displayed when you browse a package feed, but they don't affect its behaviour. The
requireLicenseAcceptance
element can be set to false here - as you don't need that feature.
The
iconUrl
element is the path to an image to be used as the icon for your package when it is displayed in Visual Studio. It can be an
http://
or
file://
style of url. I've been using a file URL as I'm also hosting my packages on a file share – but I'll get to that later. You need to use a 32px square
.png
file for this.
Finally for the metadata, the
references
section declares the set of files you want added to your project references when you install this package. So we add a
reference
element for each of the DLLs we discussed earlier.
In the
files
element, you declare the set of files you want copied into your solution when the package is installed. For each
file
you need to specify the source (ie where the file should be found when creating the package) and the target (where the files should be copied when the package is installed). I've chosen to create a version-specific "lib" folder to hold the binaries for each version of Sitecore (and hence each package) in my solution. But you always want the target to be the solution's lib folder.
[Another route to building packages (rather than just editing the XML) is to make use of the package building GUI that is available. I used this to build the first package I created, but from then on found it easiest to just edit the XML for these fairly simple packages]
url copied!
For example you can run:
"C:\Program Files (x86)\NuGet\NuGet.exe" pack Sitecore-6.6.nuspec -NoPackageAnalysis
to generate a package.
Since the file references in the package definition are relative, you need to run this from the same location as the definition file.
If your package definition is valid, you'll end up with a package file named for your id and version: (Sitecore-6.6.0.130404.nupkg
for the example above. If not, you'll get an error message.
url copied!
First, find a suitable place on your network. It needs to be a server with good uptime and backup, which is accessible by everybody who wants to build your code. I've been making use of a central file server on our work network. Create your share and stick your package files in it. (I've also used this location as the place to stick my package icon files)
[Note that when you build new package files you should just copy them to the folder. Don't delete any old ones. Leaving the old versions allows you the flexibility to reference and build against previous releases – see later]
Next you have to configure Visual Studio to know where your custom package feed is. Open the Tools / Options dialog in Visual Studio, and select the NuGet package manager options:
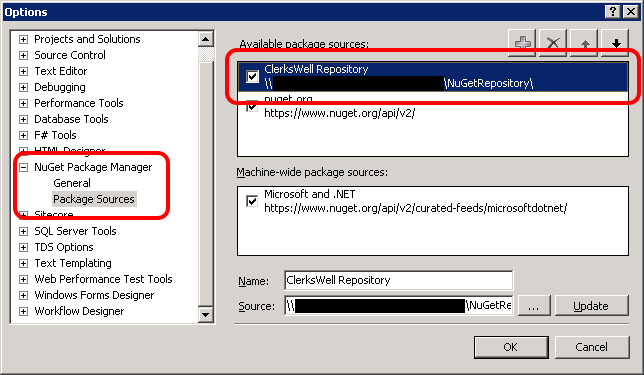
Click the "plus" icon in the top right to add a new feed, and then fill in the Name and Source fields with appropriate settings.
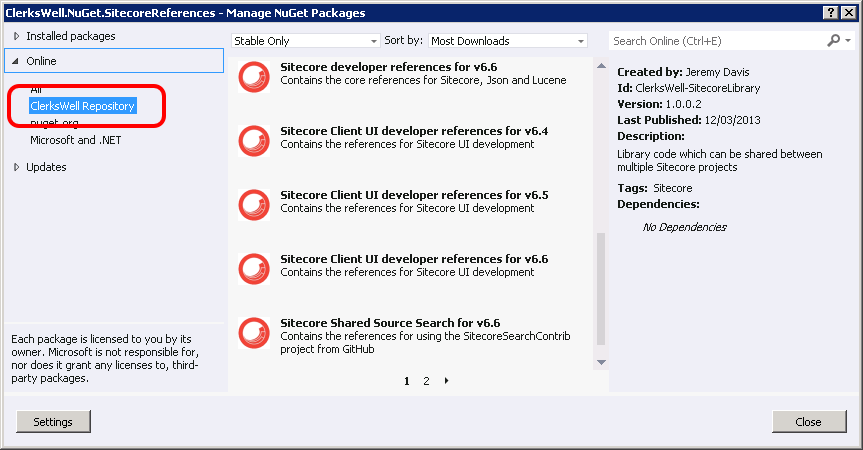
With that done, when you click the "Manage NuGet Packages" option for your project, and you should now see your custom feed displayed alongside the standard ones:
url copied!
My project looks like this:
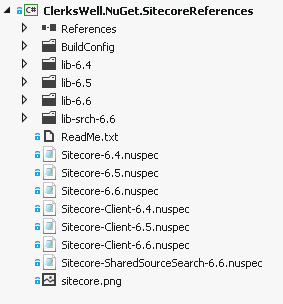
There are a series of "lib" folders to hold the binaries I want to package for each version of Sitecore I am supporting. At any time these hold only the latest versions of the binaries. Then for each of these folders there is an associated
.nuspec
file to define its package. And there is also a copy of the icon file being used for the packages.
The
BuildConfig
folder contains text files holding the paths to the
nuget.exe
file and the shared folder being used as the NuGet repository. These are used by the build events added to the project file. The build is managed by the following MSBuild xml:
<Target Name="AfterBuild">
<ReadLinesFromFile File=".\BuildConfig\NugetCommandLine.txt">
<Output PropertyName="NuGetPath" TaskParameter="Lines" />
</ReadLinesFromFile>
<CreateItem Include="*.nuspec" Exclude="">
<Output ItemName="NuSpecFiles" TaskParameter="Include" />
</CreateItem>
<Exec Command=""$(NuGetPath)" pack "%(NuSpecFiles.Identity)" -OutputDirectory .\$(OutputPath) -NoPackageAnalysis" />
<Message Text="Nuget for $(TargetName) finished." />
</Target>
First it reads the contents of the "NugetCommandLine.txt" file into an MSBuild variable called "NuGetPath". Then it generates a list of files in the project folder matching the "*.nuspec" pattern. Then finally it calls the NuGet command line tool (using the NuGetPath variable) passing the "pack" command described above and the file names found from the pattern. It tells NuGet to send the packages to the project's output directory.
Hence each time you build, it will generate the correct set of package files.
To follow that up, I have a second event:
<Target Name="DeployNuGet" AfterTargets="AfterBuild" Condition=" '$(Configuration)' == 'Release' ">
  <ReadLinesFromFile File=".\BuildConfig\NuGetLocalRepository.txt">
    <Output PropertyName="DeployPath" TaskParameter="Lines" />
  </ReadLinesFromFile>
  <CreateItem Include="$(OutputPath)\*.nupkg" Exclude="">
    <Output ItemName="DeployFiles" TaskParameter="Include" />
  </CreateItem>
  <Copy SourceFiles="@(DeployFiles)" DestinationFiles="@(DeployFiles->'$(DeployPath)\%(Filename)%(Extension)')" SkipUnchangedFiles="true" />
</Target>
This reads the content of the "NuGetLocalRepository.txt" file into a variable, creates a list of all the package files in your project's output folder, and then copies the packages into the repository folder. This only runs after a release build, and it ensures all the packages being built are correctly deployed to the package share.
url copied!
If you find yourself in this situation, you need to make use of the "Package Manager Console" window in Visual Studio instead. You can specify a specific version to add by typing a command like this into that window:
Install-Package Sitecore-6.6 -Version 0.130404.4
Since the old package versions are kept in the package feed, this can fetch the version specified and add it to your solution.
You can also use the
Get-Package
command to work out what versions of a specific package are currently available.

