
Jeremy Davis
Sitecore, C# and web development
It's been a while since I wrote about home networking stuff – but I've been doing some upgrades recently, to improve my home-working situation... So I have product thoughts, and there are a few things I wanted to remember if I ever have to re-do any of this.
 url copied!
To help with that, I'd bought a couple of TP-Link AV-600 ethernet-over-power devices which included wifi. With their sender plugged into the router's LAN port, I had one in my office, to get my work laptop a wired connection and to push wifi signal as far as the kitchen, and one in the spare room to improve the upstairs wifi.
This worked great for the wired connection in my home office, but it still had some issues with wifi. Basically the roaming performance was poor – as you moved around the house, your device would need to switch between wifi access points – and that was annoyingly slow. You'd lose access to the wifi for about 30s each time your phone switched. And that was a bit frustrating...
Plus, having kids, it's a fairly common need to disable internet to some gaming device to lever a child off Minecraft / Rocket League / whatever. The cable company router could do this, but its app had a poor and annoying UI for this feature.
And finally all these little annoyances had begun to mount up...
url copied!
That lead me to Ubiquity's Amplifi HD products. Not new – but not ugly looking (Many "serious" wifi routers look pretty hideous to my eye) and claiming pretty great performance for the mesh wifi in terms of range and performance.
(They do make newer "Wifi 6" kit – but I don't have any devices that would really need that sort of bandwidth, so the extra expense of that didn't seem justified)
url copied!
Having actually got the kit, it's a nice unboxing experience – very much the high end packaging thing. (I'm told there are ex Apple staff involved in this company – and I think it shows) You get the router "base station", two mesh repeaters, a custom USB-C power adapter and a patch cable. And the setup process is pretty simple. The instructions are basically:
And it was pretty much that easy. The difficult bit was my cable company box. By default that works as a cable modem and router. But to use the Amplifi box as the router I need the cable box to just be a cable modem. It supports that, and there's an option in the UI to switch it into "modem only" mode.
So when I did that, the cable company box said modem mode was enabled, and it did a soft-reboot thin. I waited, plugged the Amplify box into it, and tried to do the setup process above. But the Amplifi box continued to say "no internet connection" and would not proceed... Investigating the details, it had still failed to pick up an IP address from the cable modem via DHCP...
After a lot of googling and messing about, it turns out that while the cable modem box says it's enabled modem-only mode and done a soft reboot, it actually hasn't done this at all. In the end, the thing which made it work was to power down the cable modem box completely, and then let it boot up again. That made it change modes properly, and allow the Amplifi box to connect to the internet properly.
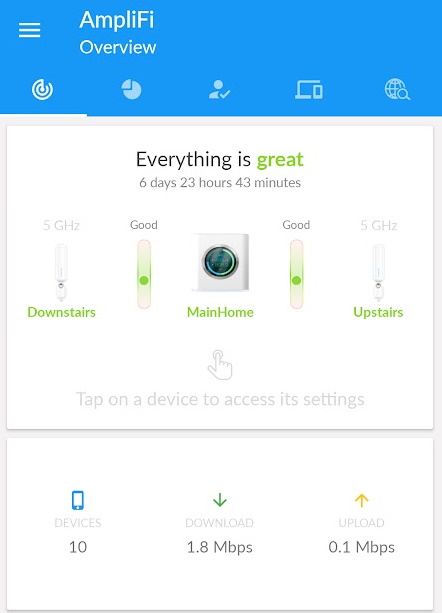
After that it was smooth sailing. The wifi signal strength of this device is significantly better than my previous setup – with just the two repeaters I now have good-to-excellent wifi in every room of the house, and the "roaming" issue appears completely gone. Plus the Amplifi UI has nice graphs to help you work out how to balance signal strength for the mesh repeaters. You're aiming to plug them in somewhere that puts this graph in the "green" bit of the band:
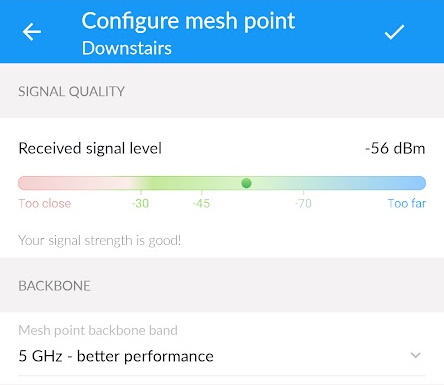
In fact with these running, I can go to the furthest corner of my house (which is on the far side of a really thick brick and stone wall) and still get a decent signal:
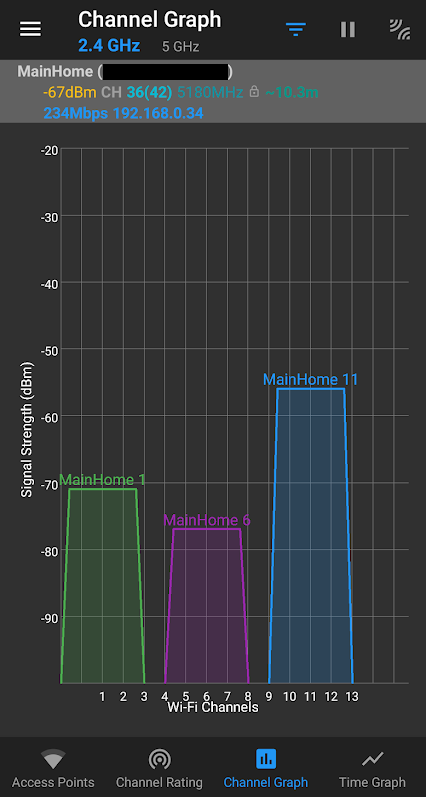
On that graph -30dbm is "you're standing next to the router". -50dbm is considered excellent strength. -60dbm is good & reliable, and -80dbm is "just enough for it to work".
As a bonus, the phone app for this kit is much faster and better than the old cable-modem one. I can now group and classify network devices to optimise QoS for streaming and gaming. And I have a much better and faster way to disable the XBox when kids get grumpy. You can click a button to disable any device or group of devices immediately. Or you can schedule "quiet time", where the network is turned off for a group of devices according to the time. So I don't even have to be in my house to annoy my children now!
It's also really stable – looking at the device today I have 72 days & 10 hours uptime. The only reason I've needed to reboot this so far has been because it got a software update.
The negatives are minor really. There is a web-based admin portal (if you don't have the app to hand) but it's missing features compared to the app, and has not had the same level of UI polish. And the base station comes with sound effects (yes, really) that you will almost certainly want to switch off in the first ten seconds of using it 😉
It also has a vpn-type featured called "teleport" which allows the app to connect to your internal network from anywhere. Unfortunately there's no PC equivalent of this feature. And since Android doesn't allow that VPN-type networking to be shared over the phone's hotspot-wifi, most of the power of this feature seems wasted to me. I'm not sure what I'd actually use it for, as implemented.
Overall review: 9/10 – Not perfect, but easily the best home wifi kit I've used...
url copied!
With that done, the Amplifi box can be configured to have the Pi as its DNS server. Turns out the DHCP here always gives out the Amplifi box's IP as the DNS server But it will now always answer DNS queries via the Pi's lookup process.
That means I now have automatic filtering for every device on the network, which is great.

But it does mean the Pi-Hole UI only ever sees one "client" of the DNS service – the Amplifi box, so it's not obvious which device did any lookup in the Pi-hole UI.
I'm musing about whether I should change this, so that the Pi-Hole becomes the network DHCP server. But so far it's working well enough that I think I can live with this...
Pi-hole is also very easy to update – SSH into the server and run
pihole -up
whenever the UI reports an update is available.
One thing to note is that the OTB Pi-Hole block list will disable some things you probably do want. So far I've had to re-enable: the domains for when you click a link in Twitter, and for ad-results in Goole and Amazon searches. And I've also noted that it blocks Google Tag Manager by default – which did confuse me while doing some work development... I suspect there will be more, but these are easy to enable in the Pi-Hole UI, so it's not a major issue.
↑ Back to top
