
Jeremy Davis
Sitecore, C# and web development
If you're reading this soon after I post it then it's very nearly the end of the "grace period" where anyone can run Docker Desktop. As of 1st February if your business meets certain requirements you have to pay for each user. So what can us Sitecore devs do if we aren't in a position to pay that fee? Well the good news is you can run Docker without the Desktop bit, and it's not too tricky once you wrap your head around a few things...
I should note that I've been working this out on Windows 10 Professional. It's possible that this needs tweaking for Windows 11, but I've only had the chance to test the steps against Win 10 VMs in Azure as that's my use case.
 url copied!
Microsoft provide two optional features for Windows which are needed for Docker to run. One is the Hyper-V virtualisation infrastructure that allows the Docker engine to run VMs, and the other is Microsoft's containers feature.
It's easy to verify and install optional features via PowerShell. You can call
Get-WindowsOptionalFeature
to test if a feature has been installed, and
Enable-WindowsOptionalFeature
if you need to add it. So I tried wrapping those up in a helper function to install a named feature:
function VerifyWindowsFeature
{
	param(
		[string]$featureName
	)

	$hasFeature = (Get-WindowsOptionalFeature -FeatureName $featureName -Online | Select -ExpandProperty State) -eq "Enabled"
	if(-not $hasFeature)
	{
		Write-Host "$featureName feature not currently installed - adding" -ForegroundColor Yellow
		$result = Enable-WindowsOptionalFeature -Online -FeatureName $featureName -NoRestart -All

		return $result.RestartNeeded
	}
	else
	{
		Write-Host "$featureName feature is already installed" -ForegroundColor Green
		return $false
	}
}
Installing features like this often requires a restart - but helpfully you can tell Windows "don't reboot please" and get a flag back saying whether a reboot is required. So this function can be called a couple of times to install the two features needed, and then we can test if a reboot is required:
function EnsureWindowsFeatures
{
	$containersNeedsRestart = VerifyWindowsFeature "Containers"
	$hyperVNeedsReboot = VerifyWindowsFeature "Microsoft-Hyper-V"

	if($containersNeedsRestart -or $hyperVNeedsReboot)
	{
		throw "Restart required after adding Windows features"
	}
}
I toyed with the idea of using
Restart-Computer
here to force a reboot, but ended up leaving it out. I'm not sure that's the best idea. But after this has run and a reboot has been performed (if needed) the machine should be in a state to install Docker.
url copied!
It's not well advertised, but Docker does provide a simple download for just the Windows container engine. I found this via a helpful blog post, which has a very basic script for installing the Docker engine. It's interesting to note that this download is specifically for Windows containers though - unlike the Docker Desktop install, it doesn't appear to support switching over to run Linux images. The post does highlight what you need to do in order to run in mixed-mode though, if you want to investigate that - but I was focused on Windows containers for this, so I've stuck with the simplest solution.
That blog post gave the basic outline for getting the Docker engine to run: Download and extract the zip file, add its location to the system path, and register the Docker service. But the script in the blog post doesn't deal with the idea that you might want to change versions, or address the issue of running containers when you're not an admin. So a bit of rework was in order for my needs, and I got to experimenting...
The first thing I wanted to check was whether the Docker service was already running. That's fairly easy to do with PowerShell - you can filter the results of
Get-Service
by the known name of the Docker service that gets installed. If there are results then the service exists. The result is an object which gives you the name and state of that service, so you can tell if it's running or not. And if it is you can check if there are any active containers. I probably need a better way to handle this, but for a first pass the script throws an exception at that point - I didn't want to try and delete the service if it was working. But otherwise the service can be stopped and (since we know at this point that the Docker code must already be present) the command line to unregister it can be called:
function StopAndRemoveExistingService
{
    param(
        [string]$svcName
    )
    $service = Get-Service | where { $_.Name -eq $svcName }
    if($service.length -eq 0)
    {
        Write-Host "No existing service for $svcName" -ForegroundColor Green
    }
    else
    {
        $service | % {
          Write-Host "Service '$($_.DisplayName)' exists" -ForegroundColor Yellow
          if($_.Status -eq "Running")
          {
            Write-Host "$($_.Name) service is running" -ForegroundColor Yellow

            $items = docker ps -q

            if($items -ne $null)
            {
                throw "Containers are running - stop them before running this script"
            }
          }

          Write-Host "Removing service" -ForegroundColor Green
          Stop-Service $_.Name
          dockerd --unregister-service
        }
    }
}
So with the service stopped and unregistered (if it existed) the next job is to download the archive that Docker provide. Given I was running this code fairly often while I tested, I optimised it a bit by avoiding the download if the file already existed. The
$name
variable here is just to make the debug output more readable, as I figured this function might be useful for more than one download in this bit of work: (Spoiler - it was...)
function DownloadFile
{
    param(
        [string]$name,
        [string]$downloadUrl,
        [string]$output
    )

    if(-not(Test-Path $output))
    {
        Write-Host "Downloading $name file" -ForegroundColor Green
        Invoke-WebRequest -Uri $downloadUrl -OutFile $output
    }
    else
    {
        Write-Host "$name already exists" -ForegroundColor Yellow
    }
}
Working out the newest
$downloadUrl
here (for the latest version of Docker) is a project for another day - but for the moment it's easy enough to call this function with a fixed version string like
https://download.docker.com/win/static/stable/x86_64/docker-20.10.8.zip.
With that zip downloaded, it can be extracted easily enough:
Expand-Archive $dockerZip -DestinationPath $dockerEnginePath -Force
In order to be able to run the "register Docker as a service" command, the code needs to make sure that the folder which has been unzipped is in the system path. The easiest way to handle that is to check if the install folder is already in the path, and if not add it:
function EnsureDockerInPath
{
    param(
        [string]$installPath
    )

    $path = [System.Environment]::GetEnvironmentVariable("Path","Machine")
    if(-not($path.Contains($installPath)))
    {
        $newPath = "$($env:path);$($installPath)"
        Write-Host "New path: $newPath" -ForegroundColor Green
        [Environment]::SetEnvironmentVariable("Path", $newPath, [System.EnvironmentVariableTarget]::Machine)
        $env:Path = [System.Environment]::GetEnvironmentVariable("Path","Machine") + ";" + [System.Environment]::GetEnvironmentVariable("Path","User")
    }
    else
    {
        Write-Host "Path is already correct" -ForegroundColor Yellow
    }
}
I suspect this isn't "right" as there are circumstances where the test might get the wrong answer, but it's good enough for a first pass.
And with that done, it's easy to install and start the service:
function EnsureDockerServiceRunning
{
    param(
        [string]$svcName
    )

    Write-Host "Registering & starting $svcName service" -ForegroundColor Green
    dockerd --register-service
    Start-Service $svcName
}
Those functions are enough to get a basic install running. They can be combined together into a simple overall script:
#Requires -RunAsAdministrator
param(
    [string]$dockerEnginePath = "C:\",
    [string]$dockerInstallPath = "C:\Docker",
    [string]$dockerEngineUrl = "https://download.docker.com/win/static/stable/x86_64/docker-20.10.8.zip",
    [string]$dockerZip = "docker.zip",

    [string]$serviceName = "docker",
)

# Make sure Hyper-V etc is installed
EnsureWindowsFeatures

# Go to this user's downloads folder
pushd $(New-Object -ComObject Shell.Application).NameSpace('shell:Downloads').Self.Path

# stop & remove any running service if possible
StopAndRemoveExistingService $serviceName

# Fetch the docker engine and unzip it
DownloadFile "Docker" $dockerEngineUrl $dockerZip
Expand-Archive $dockerZip -DestinationPath $dockerEnginePath -Force
Remove-Item $dockerZip

# Make sure the docker folder is in the path
EnsureDockerInPath $dockerInstallPath

# Get docker service running
EnsureDockerServiceRunning $serviceName

popd
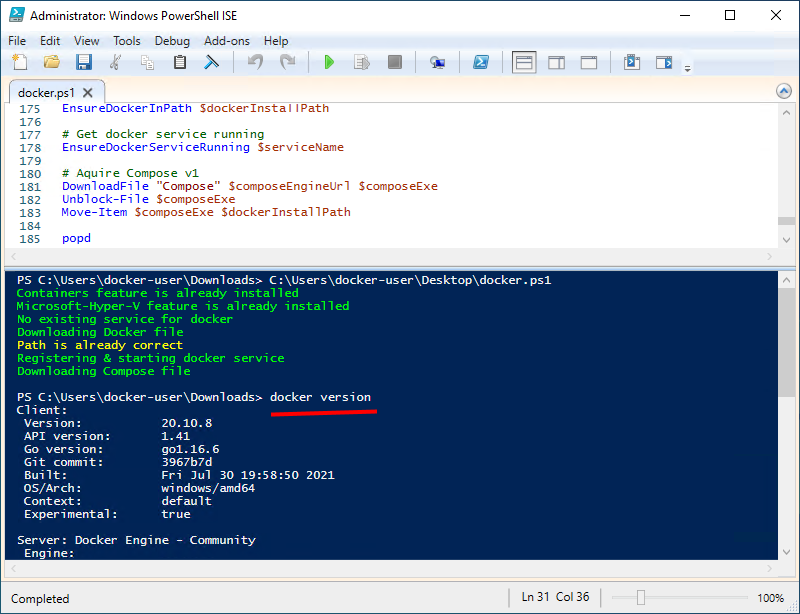
After running that script and dealing with any reboots required you should be able to run a simple test container:
docker run hello-world
But, you won't be able to run Sitecore yet...
url copied!
The current versions of the Docker engine include Docker Compose as a built-in command - but they have v2 built in to the command line tools. The Docker
Compose files provided by Sitecore for running developer instances
require v1 at present, however. If you try to start these examples from the command line after running the install outlined above, you'd have to be running
docker compose up. Note the use of a space rather than a hyphen here. That's
docker compose
rather than
docker-compose
- a subtlety that tripped me up quite hard. The hyphened variant will give a "command not found" error at this point.
But running the version with the space also gets an error:
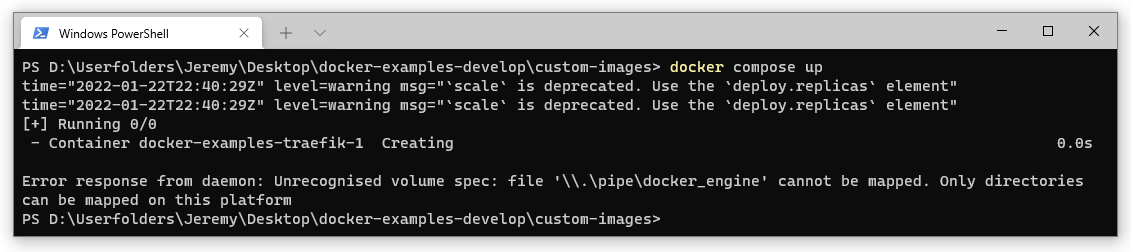
For Google's benefit, the important part of that message is:
Error response from daemon:
Unrecognised volume spec: file '\\.\pipe\docker_engine` cannot be mapped.
Only directories can be mapped on this platform.
That looks like something tricky, but it's actually just this versioning issue. When you're running Docker Desktop there's a config setting for "stick with Compose V1", and that distratcted me for a while trying to find the option for doing this with the simple version that has been downloaded here. But that's entirely the wrong approach, it turns out. You're stuck with V2 for the built-in version here, but you can separately download a V1 release of the "docker-compose" command and use that instead.
The code for the separate
docker-compose
command lives on GitHub, and you can find assorted versions
in the releases there. So to get something that's compatible with the files we're working with, we need to take the most recent V1 release. There's no installation required here. The download is a plain
.exe
file which can be copied to the Docker folder we created above, and run as-is.
The extra code to cope with that is fairly simple, and can be added into the base script above. It needs a couple of extra parameters to the overall script:
param(
    [string]$composeEngineUrl = "https://github.com/docker/compose/releases/download/1.29.2/docker-compose-Windows-x86_64.exe",
    [string]$composeExe = "docker-compose.exe"
)
And the download operation can be added to the script's logic
# Get docker service running
EnsureDockerServiceRunning $serviceName

DownloadFile "Compose" $composeEngineUrl $composeExe
Unblock-File $composeExe
Move-Item $composeExe $dockerInstallPath

popd
Adding that onto the basic script allows you to run an install which will be able to start an instance of Sitecore.
(Note, if the path to Docker is added by this script, you may well need to open a new PowerShell window in order to run Docker. I thought I'd done the business necessary to refresh the session path, but it doesn't always work for me. Another issue to look into later. But starting a new PowerShell session does always seem to get the new path so the workaround is simple enough for the moment)
url copied!
One thing that took me a while to work out was that the default installation only seems to work if you're running docker commands from an elevated console window. Users who don't have "adminsitrator" rights will get an error message that the Docker CLI commands can't access the named pipe used to talk to the engine even though the service is up and running.
That could be an issue for some users, so I did a bit more digging into how this might be resolved. I came across some google results explaining that you need to explicity grant rights to non-admin users to allow them access to the Docker service. I didn't want to have an external dependency for this bit of script, so I pulled in the core behaviour there to a function:
function GrantRights
{
    param(
        $domain,
        $user
    )

    $account="$($domain)\$($user)"
    $npipe = "\\.\pipe\docker_engine"
    $dInfo = New-Object "System.IO.DirectoryInfo" -ArgumentList $npipe
    $dSec = $dInfo.GetAccessControl()
    $fullControl =[System.Security.AccessControl.FileSystemRights]::FullControl
    $allow =[System.Security.AccessControl.AccessControlType]::Allow
    $rule = New-Object "System.Security.AccessControl.FileSystemAccessRule" -ArgumentList $account,$fullControl,$allow
    $dSec.AddAccessRule($rule)
    $dInfo.SetAccessControl($dSec)
}
For the purposes of a simple install script you can call this passing
$env:userdomain
and
$env:username
for the user credentials. But in a more complex scenario you might want to use a group, or call it for multiple users.
It's worth nothing that this function seems to fail if you try to run it before a fresh install of Docker has actually run a container. So I chose to put it into a separate script for reuse.
url copied!
So with that in place, you can run
docker-compose up
for a Sitecore install, and it will successfully start:

(If you get an error starting the Docker service and Event Viewer mentions
panic.log, try deleting the file from
C:\ProgramData\docker)
I learned an important thing while testing this: If you run up a VM in Azure to test Docker (or other virtualisation stuff) then you have to be careful which VM "size" you choose. If you pick a v1 or v2 VM you'll be able to run the script here without errors, but you'll get an error that looks like this when you try to start any container:Error response from daemon: hcsshim::CreateComputeSystem 8459c6c816e764642634ce29cfee666d30834df0f2792fba9e411d11bd0c33f6: The virtual machine could not be started because a required feature is not installedAfter some googling, it turns out this is because only v3 and above Azure VMs have Nested Virtualisation enabled. And that's required to let Docker and Hyper-V run correctly inside an Azure VM. So make sure you're careful what you pick when creating your VMs:

There's a pile more work to do here, I think, before this is a fully-fledged install script, but it's a start. There's a gist of this if you fancy playing with the code yourself - but it's very much an experiment right now. But maybe it'll be of help to you...
(And if this isn't the right approach for you, there are alternatives)
↑ Back to top
