
Jeremy Davis
Sitecore, C# and web development
Recently I found myself at the end of a sprint where a collection of developers had worked on a lot of different things in a pre-existing Sitecore solution. I needed to be able to deploy only the changes that were part of the sprint, and I had to generate a deployment package that could be installed by the client. And I didn't have access to any fancy tools such as Hedgehog TDS, that can be used to automate these things in other ways.
Following the old adage that it's better to automate once than to do a boring or difficult job many times, I sat down to see whether I could create a script for deciding what stuff needed to go into the package. All the changes were checked into Team Foundation Server, so I tried experimenting to see if I could extract this data automatically. The results of my experiment are described below. It needs polishing into something more generally usable, but it's good enough for a quick write up:
The starting point for this was the
Team Foundation Server command line tool
tf.exe. Its "history" command allow you to list out sets of changes, but it requires a bit of digging to work out the correct command line syntax for this job. In the best traditions of powerful command line tools, it's a bit obtuse... But after a bit of trial and error, I settled on the following command pattern: (line breaks included for readability – this should all be on one line)
tf.exe
  history
  c:\myWorkingFolder\
  /recursive
  /format:detailed
  /noprompt
  /version:C27893~
The
history
command tells
tf.exe
that we're interested in what's been checked in. The next parameter is the path to the working folder for the project. Then
/recursive
tells TFS to look for changes in child folders of the path we supplied as well. The
/format:detailed
switch tells TFS that we want to know about each change set, and the files that were changed in it. The
/noprompt
switch means that the output will be sent to the console rather than to a TFS window. And finally the real magic is the
/version:C27893~
switch. This says "return changes in the changeset 27893, and any subsequent changesets as well. The "C" prefix means changeset, and the "~" sufix means "and anything after this".
So if 27893 is the changeset number for the first change after the last deployment (ie the first of the new changes we need to deploy) then that command will list out all the changesets and changed files that have been checked in since then – and that's the starting point for a deployment package. It ends up filling your console with text that looks like this:
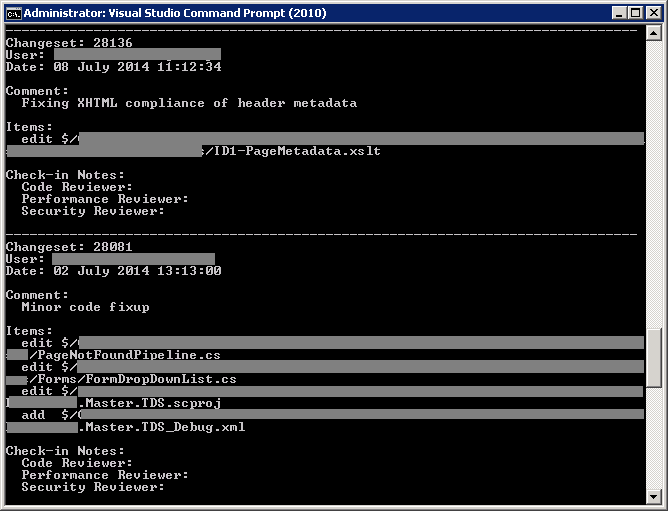
You could manually use that output to build yourself a package, but to be honest the format of that data is not particularly helpful. It would be much better if we could de-duplicate the data, filter out the lines that aren't deployable changes, and sort it all into a helpful list.
And we can – with a little help from PowerShell.
The first job is to get that TFS change data into memory in PowerShell. That can be done by running the
tf.exe
tool and capturing its output:
$firstChange = 27893

Write-host "Finding set of changes..."

$cmd = `c:\Program Files (x86)\Microsoft Visual Studio 10.0\Common7\IDE\TF.exe` history .\ /recursive /format:detailed /noprompt /version:C$firstChange~"
$result = cmd.exe /c `$cmd` | out-string
First of all, we stick the first changeset to process into a variable, so we can pass it to TFS later. (In a "proper" solution, that should be read from the command line – but that's a job for another day) Then we build up the command we need to run. We'll assume the PowerShell script will be run in the working folder we need to process, so we adjust the command line from the previous example a bit, and assign it to the
$cmd
variable. Note the use of
$firstChange
in this string - PowerShell will automatically replace that with the value of our variable. Also note the quote mark and back-tick antics required for this string. The outer speech marks are normal string delimiters. But we need to ensure we pass the inner speech marks to our command as the path has spaces in it – hence the back-ticks. They say "treat this string as a literal – don't try to parse it". And that stops PowerShell seeing the inner speech marks as the end of a string and the beginning of another.
Then finally we run
cmd.exe
and pass it the command we just generated, and pipe its output into a variable. Now the text from the screengrab above is in memory.
So the next job is to process it into something more useful. Looking at the output, all the lines we care about (the ones that represent file changes) start with "edit", "add", "delete" or similar. So we can write some code to filter each line from the input, and leave us with only the useful ones:
$changes = $result.Split(`n") | % { $_.Trim() } | Where-object { $_.StartsWith("edit") -or $_.StartsWith("delete") -or $_.StartsWith("add") } | Where-object { $_.Contains("$/") }
We split the output of our command above at the new-line character, and trim off any extra whitespace from the result. Then filter it so we have only the lines that start with "add", "edit" or "delete". And finally filter again so we have only the lines that contain "$/" – a TFS-like path.
Next job is to take that set of results – which might include duplicates, dedupe it and sort it:
foreach($change in $changes)
{
    $parts = $change.Split(@('$'), [System.StringSplitOptions]::RemoveEmptyEntries)

    if( $set.ContainsKey($parts[1]) )
    {
        $op = $parts[0].Trim()
        $val = $set.Get_Item($parts[1])
        if( -not $val.Contains($op) )
        {
            $val = $val + " " + $op
            $set.Set_Item($parts[1], $val)
        }
    }
    else
    {
        $set.Add($parts[1], $parts[0].Trim())
    }
}
For each line in our list of changes, we split it by the "$" character and discard any empty parts returned. That gives us an operation (the "add", "edit", "delete" bit) and a path. So then we try to add each of these to a dictionary using the path as the key, and appending each new operation as the value. That means we end up with each path exactly once in our dictionary, and a list of the operations associated with it.
Finally we can write the output to a file, having sorted it and done a little more processing:
if(Test-Path "changeList.txt")
{
    del "changeList.txt"
}

$binaries = $FALSE

foreach($key in $set.Keys | Sort-Object)
{
    $value = $set.Get_Item($key)

    if(-not $key.EndsWith(".csproj") -and -not $key.EndsWith(".sln"))
    {
        if(-not $key.EndsWith(".cs"))
        {
            Add-Content "changeList.txt" "$key -- $value"
        }
        else
        {
            $binaries = $TRUE
        }
    }
}

if($binaries)
{
    Add-Content "changeList.txt" "Binaries"
}
First of all, we delete the output file we're going to generate if it already exists. And we set a flag to indicate that at this point there's no reason to specify adding the binary files to our deployment package.
Then we go through each key in our dictionary (having sorted them into order) and check each one in turn. If the path references a ".csproj" or ".sln" file (The Visual Studio Project or Solution) we can ignore it. If the path points to a ".cs" (code) file then we don't need to output it, but we do need to set our "deploy binaries" flag to true. Otherwise we add the item to our output file.
Finally, we test the value of our "deploy binaries" flag, and if it is set, we add a line to the output to specify the binary files.
And when we run that, instead of the complex mess from TFS, we get a nice list of required changes:
/somefolder/ID1-PageMetadata.xslt -- edit
/somefolder/Forms/HKShortCourse.ascx -- edit
/somefolder/Forms/UKShortCourse.ascx -- edit
/somefolder/MyProject.Master.TDS_Debug.xml -- add
/someFolder/serialisation/sitecore/system/Dictionary/Forms/MyApps/Certificate/UK/ce_PlaceOffered_Accept_Pay_No_Deposit.item -- add
Binaries
And that tells us what to package in a nice friendly format. Since we've scanned both the web project and the serialisation folder in TFS we get a list of both the .Net files to deploy and the Sitecore Items too.
However I note it also includes a file that's part of the solution, rather than a deployable item – so a bit more refinement of the filters is needed, I think. If I get the chance at some point, the next step for this bit of work is to make it generate the package definition XML file directly. And working out how to use command line parameters with scripts.
But that sounds like a job for a future blog post...
↑ Back to top
