
Jeremy Davis
Sitecore, C# and web development
Since the whole "Twitter's in something of a downward spiral" thing kicked off, I'd been musing over the idea that having embedded tweets in my blog might not be such a good thing long term. What happens if the mad billionaire at the helm suddenly decides that embedding tweets should be a paid feature, or the site has a long outage? The best alternative I had was to turn the tweets into images - so obviously I investigated how I could automate this. Turns out it was a fun feature to add to my blog editor...
 url copied!
The broad plan was to be able to give the url of a tweet to my blog editing tool, and have it fetch the markup for the tweet, then render this as an image and insert the right image markup into the post being edited. The current embedding of the tweets into blog posts makes use of Statiq's shortcodes. So my starting point was to go and have a poke through the code for the Twitter shortcode and see how it worked.
Having a dig through that code showed the approach was to make use of the OEmbed standard. Twitter exposes an endpoint which you can pass the address of a tweet to. It returns a collection of bits of data, but the key one is a blob of HTML which is the relevant markup to embed a tweet - everything a browser needs to make a tweet look "right".
url copied!
For example, calling
https://publish.twitter.com/oembed?url=https%3a%2f%2ftwitter.com%2fjermdavis%2fstatus%2f1630122358890528769
returns a blob of json that looks like:
{
  "url": "https:\/\/twitter.com\/jermdavis\/status\/1630122358890528769",
  "author_name": "Jeremy Davis",
  "author_url": "https:\/\/twitter.com\/jermdavis",
  "html": "\u003Cblockquote class=\"twitter-tweet\" data-width=\"350\"\u003E\u003Cp lang=\"en\" dir=\"ltr\"\u003EOn the blog: I've had a chance to play with demo of Workato - the technology behind \u003Ca href=\"https:\/\/twitter.com\/hashtag\/Sitecore?src=hash&ref_src=twsrc%5Etfw\"\u003E#Sitecore\u003C\/a\u003E's future integration system for their composable products. \u003Cbr\u003E\u003Cbr\u003EIf you're interested in what that might look like, read on:\u003Ca href=\"https:\/\/t.co\/K2ieIMD0i0\"\u003Ehttps:\/\/t.co\/K2ieIMD0i0\u003C\/a\u003E\u003C\/p\u003E— Jeremy Davis (@jermdavis) \u003Ca href=\"https:\/\/twitter.com\/jermdavis\/status\/1630122358890528769?ref_src=twsrc%5Etfw\"\u003EFebruary 27, 2023\u003C\/a\u003E\u003C\/blockquote\u003E\n\u003Cscript async src=\"https:\/\/platform.twitter.com\/widgets.js\" charset=\"utf-8\"\u003E\u003C\/script\u003E\n",
  "width": 350,
  "height": null,
  "type": "rich",
  "cache_age": "3153600000",
  "provider_name": "Twitter",
  "provider_url": "https:\/\/twitter.com",
  "version": "1.0"
}
The
html
field here is the key thing. Parsing that out and decoding it gives us something to render.
At this point I realised an interesting benefit of this approach - that Mastodon supports the OEmbed standard too - so you can apply a similar pattern to toots on that platform. Broadly it works the same way, with one caveat: because Mastodon is decentralised you have to call the OEmbed endpoint on the server that hosts the toot in question, rather than there being a single endpoint in the case of Twitter.
So, starting to pull some code together, first there needs to be some logic to work out what sort of message we're dealing with. If the code takes in the address of the message, it can choose based on the domain:
private OEmbedType DetermineOEmbedType(Uri messageUri)
{
    if(messageUri.DnsSafeHost.Contains("twitter.com"))
    {
        return OEmbedType.TwitterTweet;
    }
    else
    {
        return OEmbedType.MastodonToot;
    }
}
And based on that decision about what the type is, you can go on to work out the right OEmbed call to make:
private string DetermineApiUrl(OEmbedType oEmbedType, Uri messageUri, int? maxHeight, int? maxWidth)
{
    string uri;

    switch (oEmbedType)
    {
        case OEmbedType.TwitterTweet:
            uri = $"https://publish.twitter.com/oembed?url={HttpUtility.UrlEncode(messageUri.ToString())}";
            break;
        case OEmbedType.MastodonToot:
            uri = $"https://{messageUri.DnsSafeHost}/api/oembed?url={HttpUtility.UrlEncode(messageUri.ToString())}";
            break;
        default:
            return string.Empty;
    }

    if (maxWidth.HasValue)
    {
        uri += $"&maxwidth={maxWidth.Value}";
    }

    if (maxHeight.HasValue)
    {
        uri += $"&maxheight={maxHeight.Value}";
    }

    return uri;
}
OEmbed also lets you specify an optional max width and height for the rendering of the message - so if these values are provided they need adding to the API call. with that url, making the request and deserialising the json to get the HTML field is pretty easy.
So now it needs rendering...
url copied!
Rendering the message requires two things. First, some sort of web browser control needs to load the HTML and do the relevant rendering. And then that rendered markup needs saving as a picture.
My blog editing app is built in WPF, and that includes a
WebView
control which can render HTML. But sadly that makes use of Microsoft's old Internet Explorer era rendering engine. That is no good at all, as most modern websites either refuse it or don't render well. But a bit of research led me to the
Microsoft.Web.WebView2
Nuget package. That's a replacement component which makes use of the Chromium engine from Edge - and that's much more suitable for this purpose.
Once that's added to the UI of an app (as a control named
webView
here), there are two things which need doing. First you need to make sure that you call an initialise method on the class before you try to get it to render anything. The simplest approach I found to that was adding te relevant code to the
OnActivated
event for the window in question. Note that this can't go in the constructor of your window class because
EnsureCoreWebView2Async()
is an async method, and constructors are always synchronous.
protected async override void OnActivated(EventArgs e)
{
    base.OnActivated(e);

    if (webView.CoreWebView2 == null)
    {
        await webView.EnsureCoreWebView2Async(null);
    }
}
The code checks to see if the
CoreWebView2
property has been given a value, and calls the init method if not. That test is necessary because
OnActivated()
can be called multiple times - if the window loses and regains focus for example.
With that done, you can ask the
webView
control to load the HTML returned by OEmbed with a call to
webView.NavigateToString(oEmbedData.html). You can add a handler to the
webView.NavigationCompleted
event if you need to know once the HTML has been loaded.
And based on that, the UI can load and display a tweet:
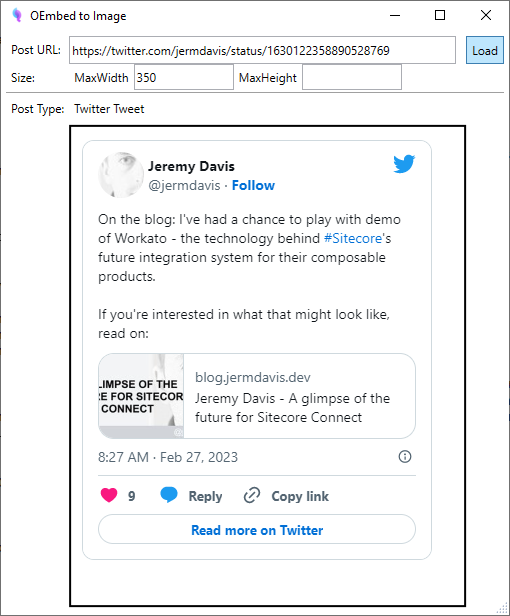
My first though about how to save this to disk as an image was that you can ask any WPF UI component to render itself to a bitmap with the
RenderTargetBitmap
class. But (logically, when you think about it) this only works with native WPF components which are using WPF's internal rendering and composition framework. But the
WebView2
component here is an integration to a non-WPF component - so this approach gets you an attractive white rectangle rather than a tweet...
But it turns out that the Chromium engine's Dev Tools
expose a set of APIs for browser automation. And one of these can render HTML elements as images. And the
WebView2
component exposes methods for interacting with this API. It involves a few steps, but it's not to complciated overall...
First up, we need to get a reference to the root of the document in the
WebView. That can be done with the
DOM.getDocument
method. It takes in a
depth
parameter, which tells it how far down the DOM tree it should return data for. In this case, all we need is the ID of the root node, so we can set this to zero.
(For all of this following code you could create classes, and use proper JSON (de)serialisation - but since this began as a bit of an exploratory hack, I've started with a
JObject/dynamic
based approach because it's quicker to prototype with. Eventually I'll get around to changing that, for performance and prettier code)
So to get the ID of the root node we can call:
dynamic getDocParams = new JObject();
getDocParams.depth = 0;

var data = getDocParams.ToString(Newtonsoft.Json.Formatting.None);
var docData = await webView.CoreWebView2.CallDevToolsProtocolMethodAsync("DOM.getDocument", data);
var docObj = ((dynamic)JObject.Parse(docData)).root;
var id = (int)docObj.nodeId;
The call to the webview's
CallDevToolsProtocolMethodAsync()
is the thing doing the work here - that sends the request and gets back an answer. And that can be parsed again to get the id required.
From there, we want to find the HTML element for the message being rendered - which can be done with a selector query against the DOM. Though that involves knowing the right CSS selector to use, as Twitter and Mastodon return different HTML from their OEmbed API calls. But it's pretty trivial to investigate the HTML involved and work out the right selector once we know the type of message we're looking at:
private string DetermineCssSelector(OEmbedType oEmbedType)
{
    switch (oEmbedType)
    {
        case OEmbedType.TwitterTweet:
            return "div.twitter-tweet-rendered";
        case OEmbedType.MastodonToot:
            return "iframe.mastodon-embed";
        default:
            return string.Empty;
    }
}
But with that and the ID of the root of the DOM, another a call to the dev tools API for
DOM.querySelector
can return the ID of the element for the message. It's the same pattern as before, with an input object of parameters and an output object with the data to extract:
dynamic querySelectorParams = new JObject();
querySelectorParams.nodeId = id;
querySelectorParams.selector = cssSelector;

var data = querySelectorParams.ToString(Newtonsoft.Json.Formatting.None);
var queryData = await webView.CoreWebView2.CallDevToolsProtocolMethodAsync("DOM.querySelector", data);
var queryObj = (dynamic)JObject.Parse(queryData);
var messageNodeId = queryObj.nodeId;
(Techically you could skip this step and just use the ID of the root element for the following steps, but that would also get any whitespace around the edges of the message from the
<body/>
element - and I didn't want that)
The next step is to take the ID of the message node and work out where it is in the flow of the HTML. A call to
DOM.getContentQuads
gets this location information, which will allow grabbing the right bit of the screen:
dynamic getQuadParams = new JObject();
getQuadParams.nodeId = messageNodeId;

var data = getQuadParams.ToString(Newtonsoft.Json.Formatting.None);
var quadData = await webView.CoreWebView2.CallDevToolsProtocolMethodAsync("DOM.getContentQuads", data);
var quads = ((dynamic)JObject.Parse(quadData)).quads;
This returns a array of
Quad
data - though in the case of asking for a single element rectangle that will be an array of one
Quad. That provides four points - the top left, top right, bottom right and bottom left coordinates of the element in the UI. We need to work out the top-left/top-right and the height/width of our element (which we know is a rectangle) from this - so extracting the top left and bottom right elements is required:
var topLeftX = quads[0][0];
var topLeftY = quads[0][1];
var bottomRightX = quads[0][4];
var bottomRightY = quads[0][5];
And then these can be passed to the final call, to
Page.captureScreenshot
which will generate the image data we want. Again, this follows the same basic code pattern:
dynamic clipParams = new JObject();
clipParams.x = topLeftX;
clipParams.y = topLeftY;
clipParams.width = bottomRightX - topLeftX;
clipParams.height = bottomRightY - topLeftY;
clipParams.scale = 1;

dynamic captureParams = new JObject();
captureParams.format = "png";
captureParams.clip = clipParams;
captureParams.fromSurface = true;
captureParams.captureBeyondViewport = true;

var data = captureParams.ToString(Newtonsoft.Json.Formatting.None);

var captureData = await webView.CoreWebView2.CallDevToolsProtocolMethodAsync("Page.captureScreenshot", data);
There's two parts to the input here. The
clip
object defines the screen-space coordinates of the element to render, based on the bounds captured in the previous step. And the main part defines how we want the rendering done. The result that comes back is a base-64 string representing the bitmap data, which can be turned into a WPF bitmap:
var imgData = (string)((dynamic)JObject.Parse(captureData)).data;
var ms = new MemoryStream(Convert.FromBase64String(imgData));

return BitmapFrame.Create(ms);
And from there the bitmap can be sent to the clipboard or saved to disk easily - and my editor already copes with inserting images.
One interesting thing I bumped into here is that Mastodon urls often include
@
characters - and since my blog is rendered using a mix of Markdown and Razor syntax, its important to correctly encode this. (since the
@
in Razor starts a code expression and the markdown render wants to HTML-encode it - both of which can break the rendered URLs) So when inserting a link around the captured image, it's important to encode that correctly. And after a lot of messing about, that turns out to be
\@\@
in a link.
So embedding the URL
https://meow.social/@bennie/110022386019757198
ends up with an image like this, and the markup that follows:

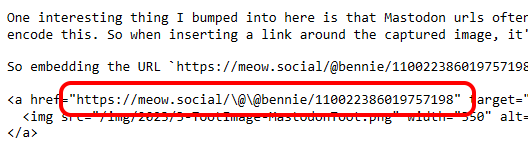
And the link works correctly... (Toot chosen carefully, owing to the level of frustration involved in getting this right...)
So now all I have to do is make sure I've replaced all the tweet shortcodes in my old blog posts with these images, and all's good.
↑ Back to top
