
Jeremy Davis
Sitecore, C# and web development
This is post 2 of 2 in a series titled Sitecore builds with Visual Studio Online
- Sitecore builds with Visual Studio Online – Part 1: Private NuGet feeds
- Sitecore builds with Visual Studio Online – Part 2: Building code and running tests
Following on from last week's "how to host private NuGet feeds in Visual Studio Online", this week we'll build on that to get some code to compile and some Sitecore.FakeDB tests to run and Hedgehog TDS to generate a deployment package in the cloud build.
Edited to add: I've made the example solution I was using to test the hosted builds available at https://github.com/jermdavis/SitemapGenerator on Github. You'll need to provide your own source for the TDS and FakeDB License file NuGet packages (which I have in a private feed) if you want to build it, however. But I figured it might be of interest to some people
Getting code, TDS and FakeDB to run together needs a minimum of three projects in your solution. (Though you can always have more if necessary) Obviously you'll need at least one project with your code in it. That doesn't need anything special other than access to whatever NuGet packages are required to compile the code. But the TDS and Test projects for the rest of the solution need a bit of tweaking to work in both a local and hosted build scenario. So here's how I made it work:
 url copied!
The
download from the TDS website
that gives you the
.msi
file to install TDS also includes the NuGet package file you need here. So you can
follow the instructions from last week's post
to upload this package to your (Private!) NuGet repository.
Once you've added this reference to your TDS project, you need to unload the project and edit the path to the TDS build
.targets
file, as per the instructions.
The final thing you need is to ensure that the TDS binaries can find their license. That's easy in a local build: If you've installed TDS on the machine then the license has already been captured when you went through the wizard. But that hasn't happened for a cloud build. You can put an XML file into your source tree that contains the data, but license data is something you don't want to accidentally make public via source control. So I think it's better to put the data into the build variables. In VSO, you can do that by editing your build and selecting the "Variables" tab and adding your license data there.
But since we've not got to the buit about creating a build yet, we'll come back to that step later in this post.
When that is done, whatever settings you put in the properties of your TDS project will be obeyed by the hosted build. Remember to set up the "build a package" properties in the TDS project for the right Build Target.
url copied!
The Sitecore DLLs bit is fairly simple. You may be able to use the same NuGet package that you're using for the Sitecore references in your source code project. Or, if that's not suitable for some reason, you can create a specialised package with just the right files and push that to your private feed.
But the license is a bit more complicated. You don't want to commit that to a public source repository for obvious reasons, and you can't use build variables here. So what to do instead?
The first thing that came to my mind was another NuGet package in your private feed. But it turns out it's not quite as simple as you might want. FakeDB expects its license file to be found in the root folder of your test project. You can put it somewhere else, but that involves changing the
.config
file - and of course that means you have to manually fix that up every time you update FakeDB, which isn't ideal. So what you really want is a NuGet package which puts the license file into the right place for you automatically.
The "simple" answer here would be to put the license file into the "content" bit of the NuGet package. That would mean the file would get added to your project in the right place. But it also gets added to source control, so you also need to add it to your
.gitignore
file to prevent that. (Or the appropriate "files to ignore" data for whatever other source control system you use) This is all fine and dandy on the machine you initially set up the project on, but later when you clone the repository somewhere else it won't build. When the NuGet restore is run (to pull down the packages for your solution) it will not re-copy the license file into the project, because it assumes the file should already be there. (Which is pretty obvious if you think about it – you might modify content files from packages, and you wouldn't want that overwritten every time NuGet ran a restore)
So after some thought, my solution to this problem is a combination of PowerShell and MSBuild. When a package gets installed for the first time, a script called
Init.ps1
can be run if you've put it in the right place in the package. I wrote a quick bit of script that makes sure you have a
.gitignore
entry for the license file:
param($installPath, $toolsPath, $package, $project)

$ignoreFile = $installPath + "..\..\..\.gitignore"

Write-Host "Looking for git ignore file at: $ignoreFile"

$content = Get-Content $ignoreFile -Raw

if( $content -like '*`*`*/`[Ll`]icense.xml*' ) {
    Write-Host ".gitignore contains line for License.xml - nothing to do."
}
else
{
    $content = $content + `r`n# Sitecore.FakeDB.Licensing nuget package`r`n**/[Ll]icense.xml`r`n"
    $content | Out-File -FilePath $ignoreFile -Encoding ascii

    Write-Host ".gitignore missing line for License.xml - added it to end of file."
}
Currently this code assumes you have a
.gitignore
file already. I feel like that's a pretty safe assumption for most people, but maybe a quick "only do this if the file exists" test might be sensible too.
Other than the character-escaping gymnastics required to correctly escape the regular expression and comment in the
.gitignore
file, it's pretty simple. Just remember that the ``` (back-tick) character is kind of the equivalent of a
\
in C# – meaning the next character is a literal. For special characters like
*` it means "treat this as a literal asterisk, not a wildcard", and before a normal character like
r` it means "this is a control code" – carriage return in this case.
The second thing I created was an MSBuild
.targets
file which includes a step to copy the license file from the NuGet package folder it gets restored to, into the root of the current project:
<Project ToolsVersion="4.0" xmlns="http://schemas.microsoft.com/developer/msbuild/2003">
  <Target Name="BeforeBuild">
    <Message Text="Copying license from $(MSBuildThisFileDirectory) to $(MSBuildProjectDirectory)" Importance="high"/>
    <Copy SourceFiles="$(MSBuildThisFileDirectory)license.xml" DestinationFolder="$(MSBuildProjectDirectory)" />
  </Target>
</Project>
The
.targets
file doesn't get copied out of the NuGet Package folder – the changes made to your Project file reference it in that location. Hence the
$(MSBuildThisFileDirectory)
variable gives you an easy shortcut for the source of the copy.
Now, the glue for all of this is your
.nuspec
file. By putting these two files in the right places in your NuGet package, you can have it magically run your script and install the
.targets
file into your project. In this case I used:
<?xml version="1.0" encoding="utf-8"?>
<package xmlns="http://schemas.microsoft.com/packaging/2011/08/nuspec.xsd">
  <metadata>
    <id>Sitecore.FakeDB.Licensing</id>
    <version>1.2016.0</version>
    <title>Sitecore Partner License, for use in FakeDB Unit Test projects</title>
    <!-- whatever other metadata fields you need go here -->
    <requireLicenseAcceptance>false</requireLicenseAcceptance>
    <description>The license file required for FakeDB to run unit tests. Also updates your .gitignore file to avoid committing the license to source control.</description>
  </metadata>
  <files>
    <file src="lib-licensing\license.xml" target="build\" />
    <file src="lib-licensing\Sitecore.FakeDB.Licensing.targets" target="build\" />
    <file src="lib-licensing\Init.ps1" target="tools\" />
  </files>
</package>
Adding the
.targets
file to the
build
folder in the package is all you need to install it. Ditto for adding the script to the
tools
folder. There's no special behaviour for
.xml
files, so putting that into the
build
folder just means it will sit there ready to process.
url copied!
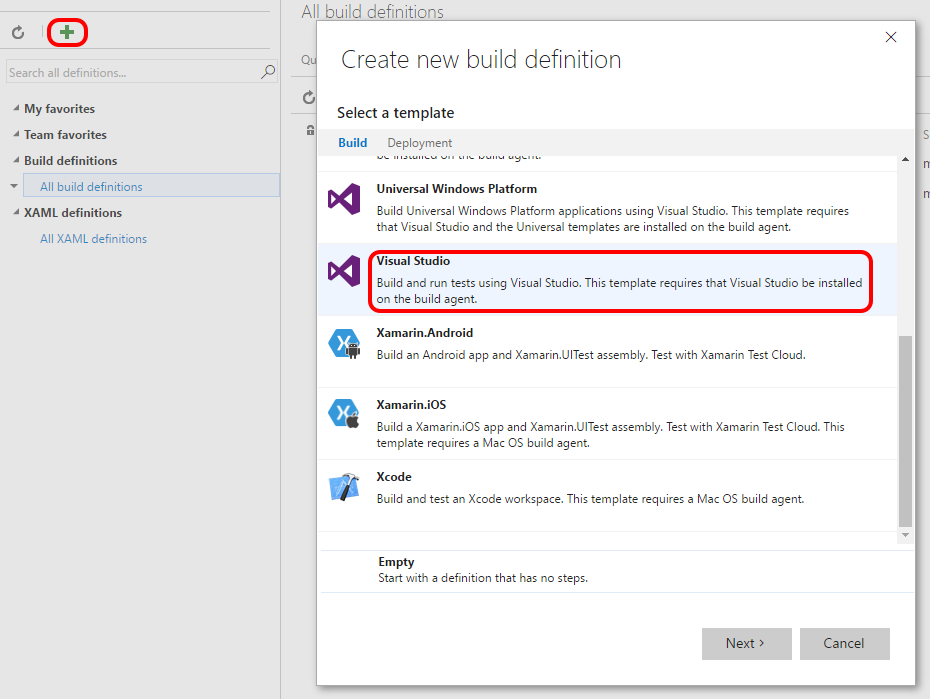
First, create yourself a new build:
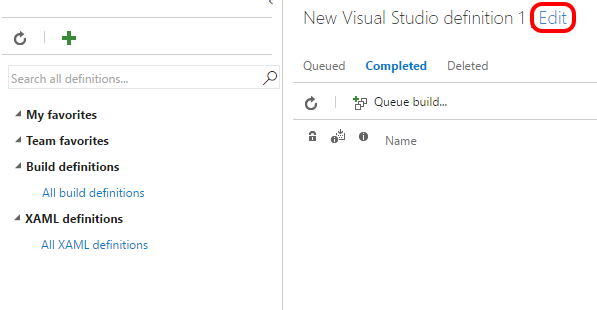
When you accept this dialog you'll get asked which repository and branch you want to build from. Fill that in to match whatever your source control setup is. When it's been created, click the carefully concealed "Edit" link:
And you can see the default set of build operations:
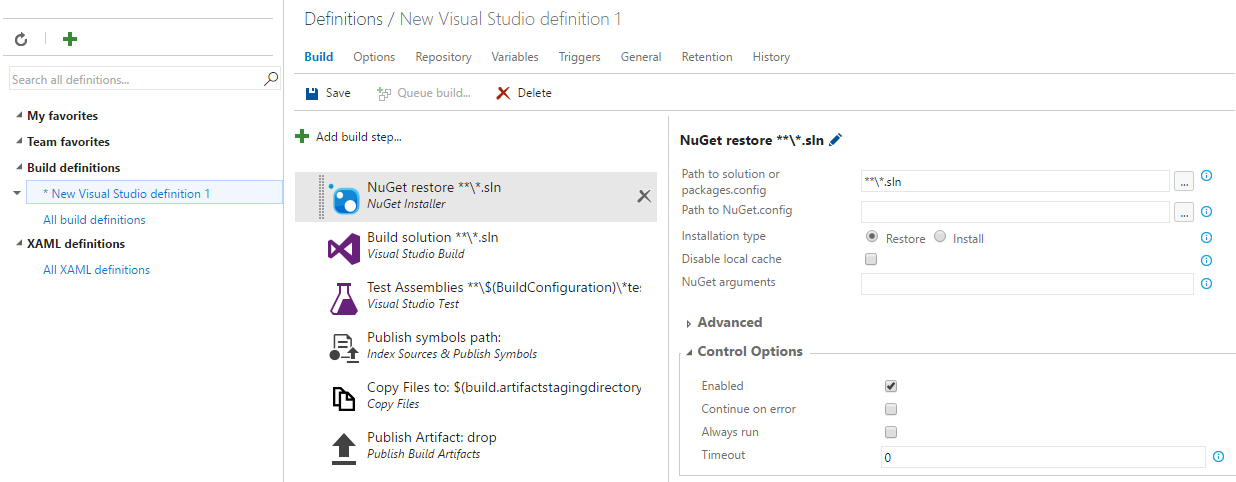
The "NuGet Restore", "Build Solution" and "Test Assemblies" tasks should work as-is if you've got your NuGet package setup right. You may or may not want the "Publish Symbols" task – that depends on what you're doing with your publishing and support processes. You can remove it if you don't want it. (It can always be added back later) For TDS builds, I think you can simplify the last two steps however. You can remove the "Copy Files" task, and re-configure the "Publish Artifact" task to find your generated package(s) directly from the TDS build outputs:
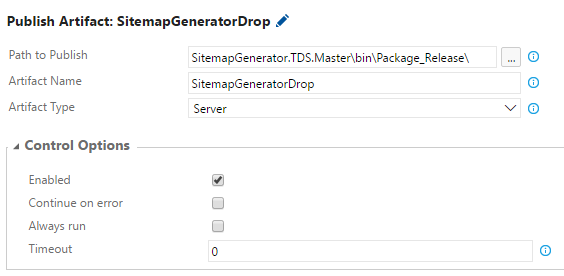
Obviously you need to make the settings match your particular projects.
Now earlier, we skipped over the step for configuring the TDS license data. Now we have a hosted build set up, we can add that data to its properies with these names:
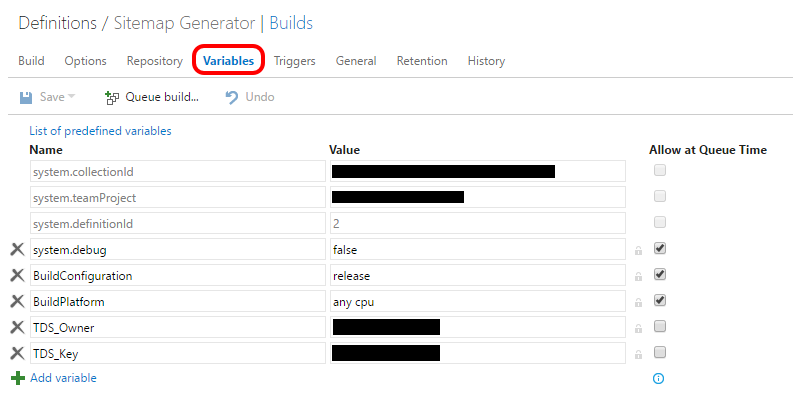
Note that for both of these items it makes sense to clear the "Allow at queue time" checkbox. That means that the license variables aren't shown on the "set your variables" dialog when you queue a build. That stops people accidentally messing them up and breaking a build.
With that done, your solution should build:
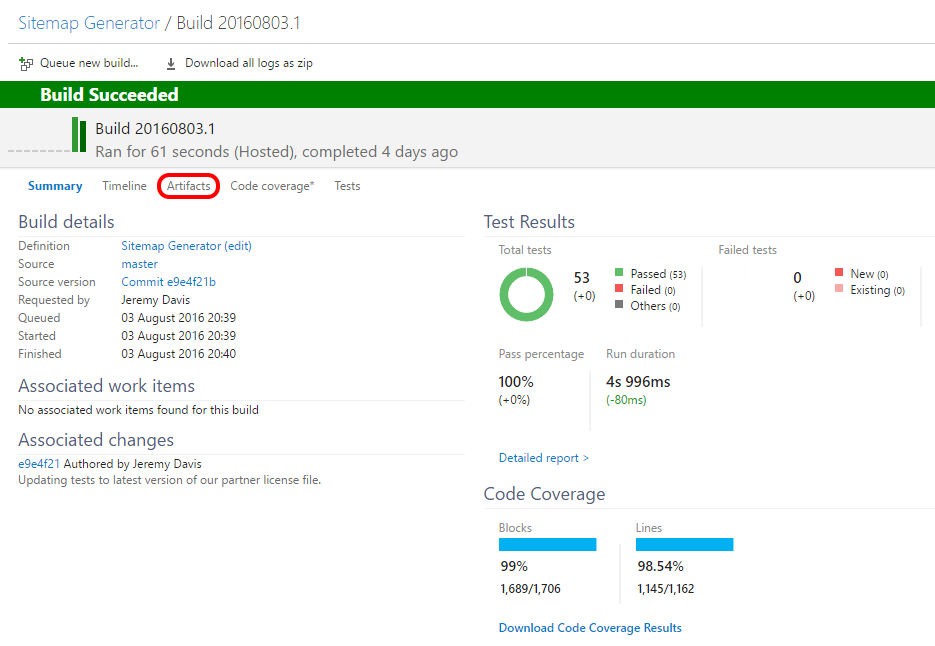
You can download the generated package by clicking the "Artifacts" tab...
Next step is to connect this process up to an automated package deployment to Sitecore on an Azure VM – but that's a task for another day...
↑ Back to top
