
Jeremy Davis
Sitecore, C# and web development
I've been using the built-in code snippets in Visual Studio for years, but for some reason until last week it had never crossed my mind to work out how to create my own. After getting bored writing the same chunk of code too often, I was reminded of the old saying "You should automate any task you have to do more than once". So I decided to have a go at some snippets. Turns out it's both a useful trick to know, and not hard to do:
 url copied!
if (SomeVariable == null)
{
    throw new ArgumentNullException(nameof(SomeVariable));
}
So I wanted to wrap that up in a way that made it easy to fill in the variable.
url copied!
<?xml version="1.0" encoding="utf-8"?>
<CodeSnippets xmlns="http://schemas.microsoft.com/VisualStudio/2005/CodeSnippet">
  <CodeSnippet Format="1.0.0">
    <!-- header element goes here -->
    <!-- snippet element goes here -->
  </CodeSnippet>
</CodeSnippets>
The
<CodeSnippet/>
element can be repeated if you have more than one snippet to define in your file.
The header section describes visible metadata for the author of the snippet and the description of its purpose. It also provides the information Visual Studio uses to decide when to insert the snippet and how to process it. For example:
<Header>
<Title>Null check a method parameter</Title>
<Author>Jeremy Davis</Author>
<Description>Creates an if() block that checks for null, and throws ArgumentNullException if so.</Description>
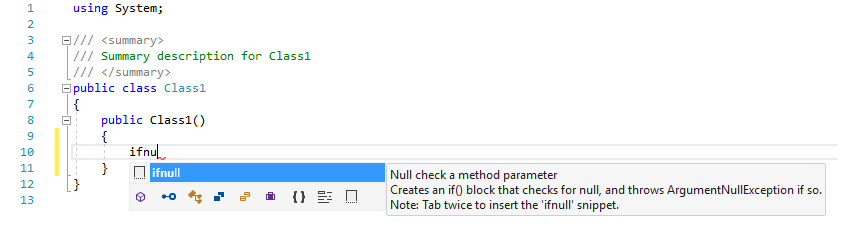
<Shortcut>ifnull</Shortcut>
<SnippetTypes>
<SnippetType>Expansion</SnippetType>
</SnippetTypes>
</Header>
The
<Shortcut>
element defines the bit of text that gets registered with autocomplete to let you invoke the snippet as you type. For example, starting to type the shortcut above gives:
The
<SnippetTypes>
element lets you list the types of behaviour you want to associate with this entry. The two you can use are
Expansion
(which is a standard snippet that just gets inserted at the current cursor position) and
SurroundsWith
(which allows the snippet text to be wrapped around your current selection by right-clicking and selecting "Snippet / Surround With" from the context menu). You can specify both if it's appropriate for your code.
In the
<Snippet>
element has two important sections to consider. The
<Declarations>
element lets you describe any replaceable parameters in your snippet (like variable names) and finally the
<Code>
element declares the text of your snippet. (There is a third element allowed here called
<References>
- but that is only used with Visual Basic snippets)
For this example:
<Snippet>
  <Declarations>
    <Object>
      <ID>parameter</ID>
      <Default>MethodParameter</Default>
      <ToolTip>The name of the parameter you wish to test for null</ToolTip>
    </Object>
  </Declarations>
  <Code Language="CSharp"><![CDATA[if($parameter$ == null)
            {
                throw new ArgumentNullException(nameof($parameter$));
            }$end$]]></Code>
</Snippet>
The
<code/>
element for the snippet needs to declare which language your text is for, and it should contain a
CDATA
section to ensure that the code it contains doesn't get messed up by being in XML. Whitespace in this section will be inserted as part of the snippet, so keeping the
CDATA
declaration and the start of the snippet on the same line will prevent extra blank lines in front of the code. The same goes for the end of the
CDATA
section.
There are some special tokens which you can add here - which are identified by being surrounded by dollar signs. The token
$end$
specifies where you want the cursor to end up after the snippet is inserted and any parameters have been resolved. (Chances are, this is at the end of your snippet so that you can insert it and continue typing the rest of the code easily) The
$selected$
token identifies where the selected text should go if you insert it as a "surround with" snippet. And then you can define further tokens that you want the user to fill in when your snippet gets inserted – such as
$parameter$
above. These tokens need to be defined in the
<Declarations>
section.
Each of your custom tokens needs an
<Object>
element under
<Declarations>. For each of these you have to declare an
<ID>
(which matches the token in your snippet text, but without the dollars), a
<Default>
(which is the text that will be inserted by Visual Studio and then highlighted yellow to show that the user has some text to fill in) and a
<ToolTip>
for help. For example, the XML above gives:
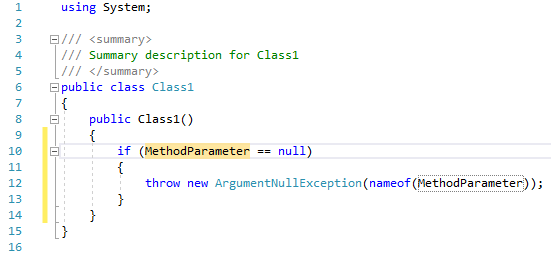
As with the standard snippets, typing over one of the bits of yellow default text and hitting enter will replace all instances of that token with your new text.
url copied!
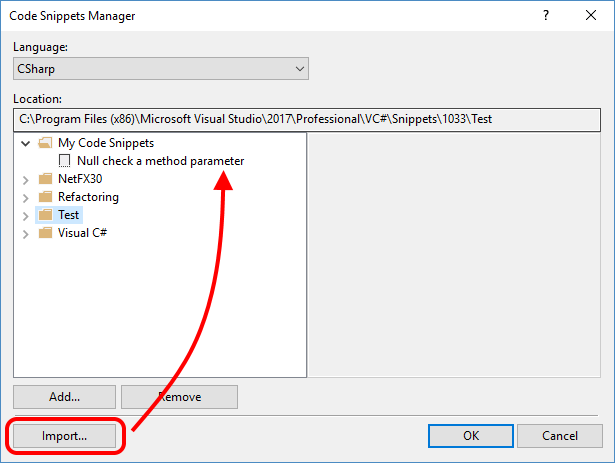
Click the "Import" button to select your file.
To import a snippet you don't have to adjust the "Language" dropdown – it will file the snippet in the right place based on the metadata described above. But you do need to change that if you want to find your snippets in the UI.
Once you've imported your file, it will be available for use straight away. To experiment, you can download my example here if you wish.
url copied!

[And yes, before anyone feels the need to get too pedantic, I know that: a) you probably wouldn't want to use a constant string for the user here – that's just to simplify the example and b) that
\
is creating a tab and hence messing up the username – that's a typo I've not had time to correct]
I'm sure there are plenty more examples to be thought up...
↑ Back to top
