
Jeremy Davis
Sitecore, C# and web development
A while back I wrote about some initial investigations I'd made towards having SolrCloud in a containerised Sitecore instance. Since I worked on that, Sitecore have shipped their "official" container approach, so I've revisited my experiments using the examples Sitecore provides.
 url copied!
My first attempt was to use the files that Sitecore already added to the container in order to make the zip files that SolrCloud needs to upload. In theory I could copy the
conf
folder from the Master index and the Xdb index and use PowerShell to make the relevant zip files. Unfortunately this just doesn't work...
There's some aspect of how PowerShell's
Compress-Archive
(and Windows "Send to Compressed Folder") generates zip files that isn't compatible with SolrCloud. The zip files I generated inside the container would upload OK, but looking at them via the File Browser in the Solr UI, they would be wrong. Instead of an expanding tree of folders and files, I'd not get the right set of folders. I've seen it get a list files (no folders) but with the folder names prepended to the filenames in a single list. And I've seen it get a single entry like this:
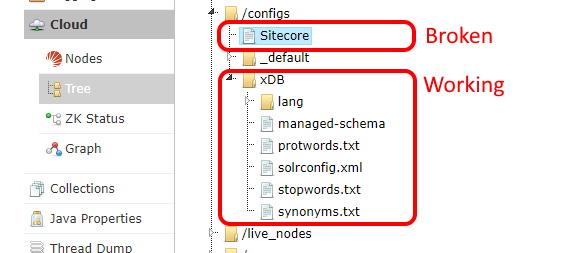
If this happens, when you try to create collections based on a broken config, you'll get an error from Solr. Sometimes it's about missing language files, and sometimes about the
solrconfig.xml
file. Something like:
2020-08-29 20:32:12.485 ERROR (qtp1629687658-17) [c:sitecore_core_index s:shard1 r:core_node2 x:sitecore_core_index_shard1_replica_n1] o.a.s.h.RequestHandlerBase org.apache.solr.common.SolrException: Error CREATEing SolrCore 'sitecore_core_index_shard1_replica_n1': Unable to create core [sitecore_core_index_shard1_replica_n1] Caused by: Can't find resource 'solrconfig.xml' in classpath or '/configs/Sitecore', cwd=C:\solr\server
solr_1  |       at org.apache.solr.core.CoreContainer.create(CoreContainer.java:1242)
solr_1  |       at org.apache.solr.handler.admin.CoreAdminOperation.lambda$static$0(CoreAdminOperation.java:93)
solr_1  |       at org.apache.solr.handler.admin.CoreAdminOperation.execute(CoreAdminOperation.java:362)
solr_1  |       at org.apache.solr.handler.admin.CoreAdminHandler$CallInfo.call(CoreAdminHandler.java:397)
solr_1  |       at org.apache.solr.handler.admin.CoreAdminHandler.handleRequestBody(CoreAdminHandler.java:181)

snip...
What I've found is that you need to use a 3rd party tool like 7Zip to create the archive files. I've not had time to work on getting that into the container for build – so I've manually used the tool to make the correct content index and Xdb index zip files so far.
The process is pretty simple: Grab the
conf
folder from the default config that ships with Solr, drop the correct
managed-schema
file (for either an existing V10 Xdb or content database index) and then zip it up. You're creating a zip which includes these files and folders:
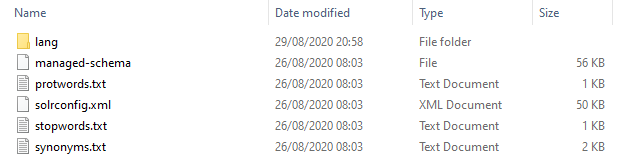
These files can then be added to the image build:
# escape=`

ARG BASE_IMAGE

FROM ${BASE_IMAGE}

RUN New-Item -Path 'C:\\cloud' -ItemType Directory | Out-Null;

COPY StartCloud.ps1 C:\Cloud
COPY MakeCollections.ps1 C:\Cloud
COPY Sitecore.zip C:\Cloud
COPY Xdb.zip C:\Cloud
COPY Collections.txt C:\Cloud

SHELL ["powershell", "-Command", "$ErrorActionPreference = 'Stop'; $ProgressPreference = 'SilentlyContinue';"]
(I'm pretty sure there's a simpler/better way of expressing this – but it does the job)
The
MakeCollections.ps1
and
StartCloud.ps1
scripts are much the same as before. Though I've stripped out the bits of the collection making script that dealt with
the embedded schema zip file, since that data is just getting copied into the container here.
The set of collections to create has been pulled out to a text file for config in this version, so it's easier to change. By default it creates the full set of XP containers, but this could be adjusted so that it only creates XM collections if required.
url copied!
  solr:
    image: ${REGISTRY}${COMPOSE_PROJECT_NAME}-xm1-solrcloud:${VERSION:-latest}
    build:
      context: ./containers/build/solrcloud
      args:
        BASE_IMAGE: ${SITECORE_DOCKER_REGISTRY}sitecore-xm1-solr:${SITECORE_VERSION}
    mem_limit: 1GB
    entrypoint: powershell -Command "& C:\Cloud\StartCloud.ps1 c:\solr c:\data"
    volumes:
      - ${LOCAL_DATA_PATH}\solr:c:\data
The image name gets changed to SolrCloud, so the thing we build doesn't overwrite the Solr image. The build context needs to point at the new
Dockerfile
that we created above, sitting in its folder with the other files it needs. And the base image is set to Sitecore's standard one. The other key change here is the entrypoint – which needs to run the
StartCloud.ps1
script, so that it can
run a background creation process for the collections, and then ensure
Solr fires up with the
-c
command line parameter.
That's enough for us to start SolrCloud, but we need to tweak the other containers too. Anything that wants to access Solr needs to use the
;SolrCloud=true
parameter on its search connection string. Since these compose files pass connection strings as environment parameters, it's a simple tweak. For an XM instance, the CD and CM services need a small tweak in the override file to add this:
  cm:
    environment:
      Sitecore_ConnectionStrings_Solr.Search: http://solr:8983/solr;SolrCloud=true
And if you're running XP, you need to do the same trick for the xConnect and Xdb search worker services:
  xconnect:
    environment:
      Sitecore_ConnectionStrings_SolrCore: http://solr:8983/solr/sitecore_xdb;SolrCloud=true

  xdbsearchworker:
    environment:
      Sitecore_ConnectionStrings_SolrCore: http://solr:8983/solr/sitecore_xdb;SolrCloud=true
And with that done, you can fire up Sitecore...
Because this setup creates blank collections as the SolrCloud container starts up, you'll have to remember to tell Sitecore to rebuild all of its indexes once everything starts up.
url copied!
If you started Sitecore using ordinary Solr before merging in these changes, remember to clean the Solr data folder! And also remember to rebuild your indexes once SolrCloud has finished creating collections.
↑ Back to top
