
Jeremy Davis
Sitecore, C# and web development
This is post 2 of 2 in a series titled Some notes on Content Hub Product Content Management
- Customising product data in Content Hub
- Querying product data and images in Content Hub
In a previous post I looked at how you can customise schema for Products in the Product Content Management feature of Content Hub. But getting data in is only half the story - how can we go about getting it back out for use elsewhere in our tech ecosystem? Well the answer is a fun combination of GraphQL and how Content Hub can serve images. Read on for my notes on one approach on configuring all of this:
 url copied!
Now Content Hub's REST API can absolutely return this data, but it's designed for flexibility and features rather than performance. Hence the need to look at GraphQL here. And these APIs are part of the "Delivery Platform" feature in the software.
(The rest of this post assumes you have enabled the Delivery Platform feature for Content Hub)
url copied!
If you're going to access your custom data via the Content Hub REST API then your changes are all available by default. But if you're going to want to see these fields via GraphQL you need to ensure you've published these schema changes to that part of the system too. In the last post in this series we customised the Product schema - so those changes need enabling for this API.
First up, you need to ensure your entity is enabled for publishing to the GraphQL Delivery Platform. At the top of the entity page there's a "Delivery Platform settings" option:
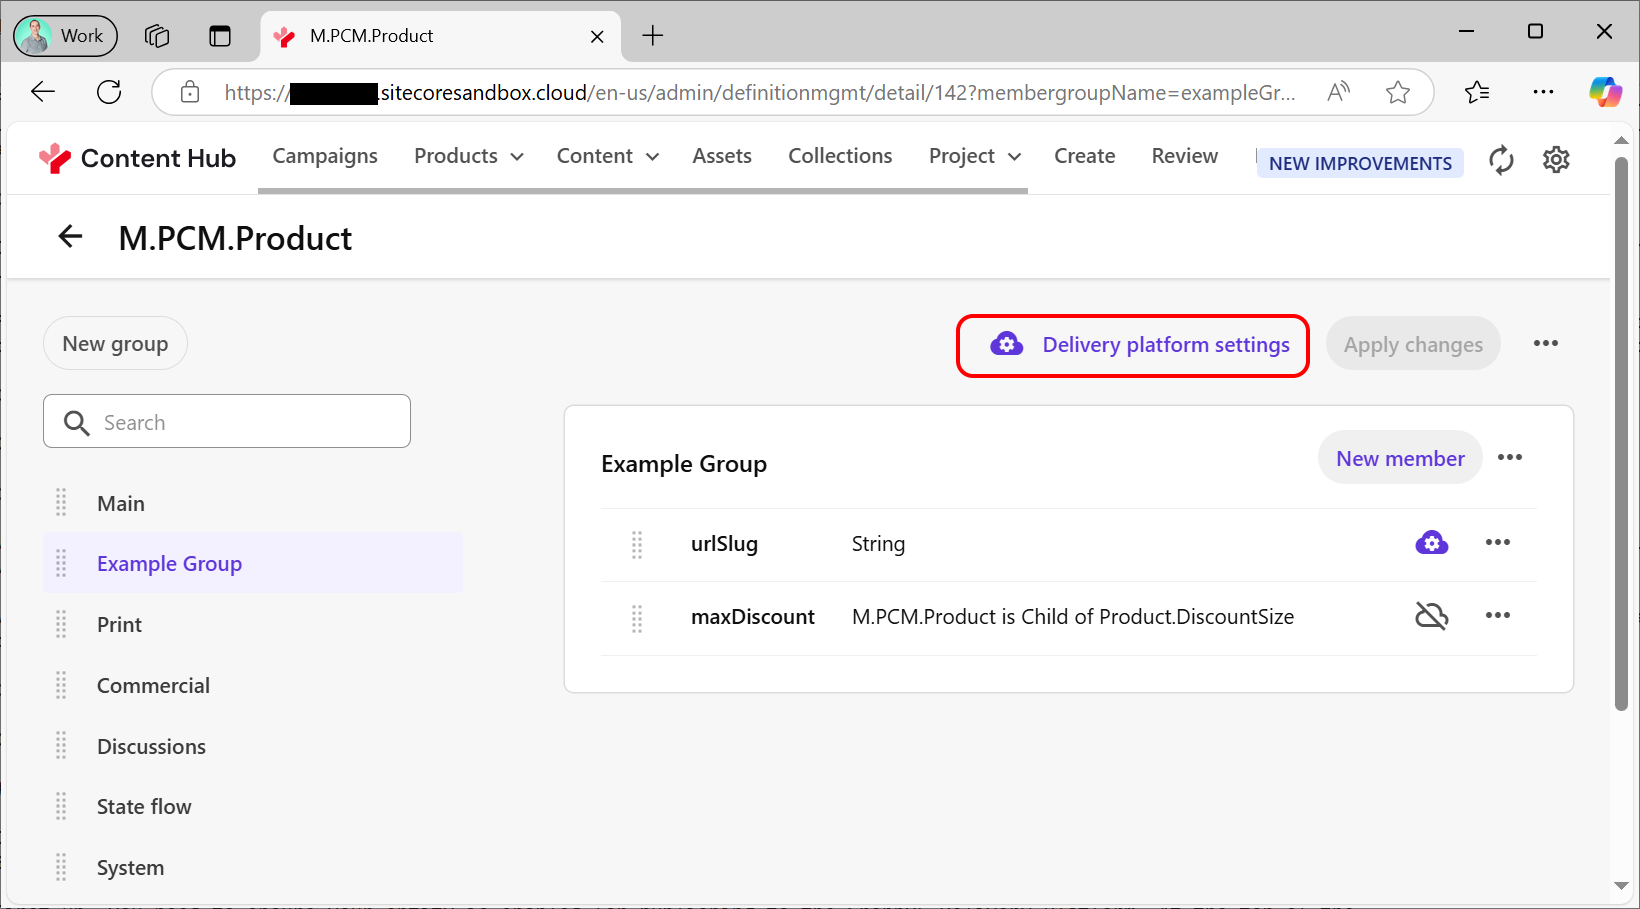
You need to ensure the "Enable in delivery platform" setting is green here. There are more advanced options for scheduled delivery too, but it won't work at all without this flag.
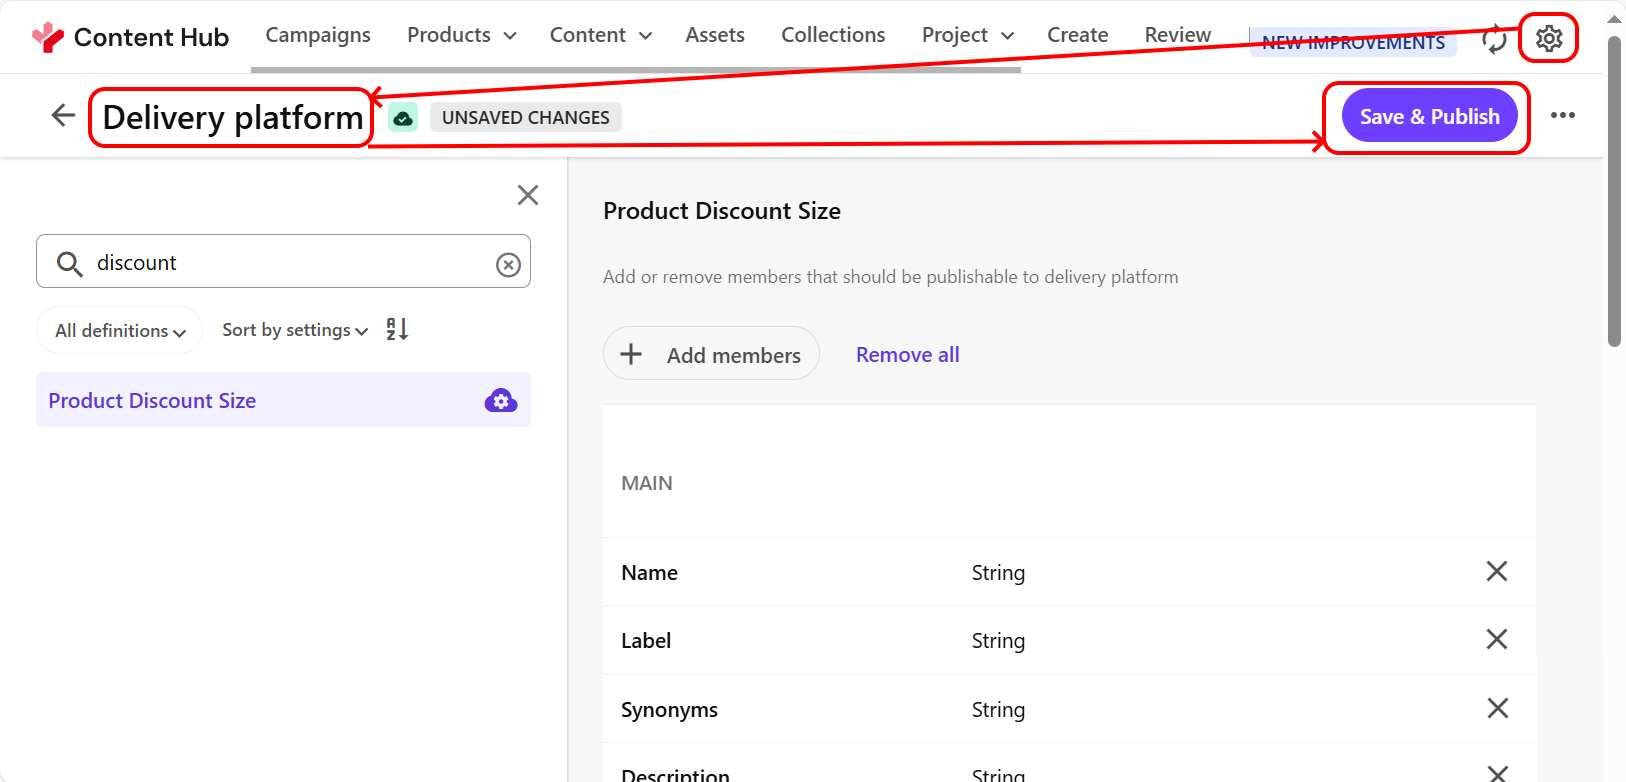
Secondly if you've made a reference to a taxonomy you need to ensure that is published to the Delivery Platform too. From the settings cog pick the "Delivery Platform" tile and search for your taxonomy. Ensure you've clicked "Save and Publish" to enable this data in GraphQL:
Finally, once the taxonomy is published you may need to ensure your new taxonomy field is explicitly enabled. If your field has a "grey cloud with a line through it" icon in the entity schema then you need to click that icon to toggle it to the enabled "blue cloud with a cog in it" state and apply these changes:
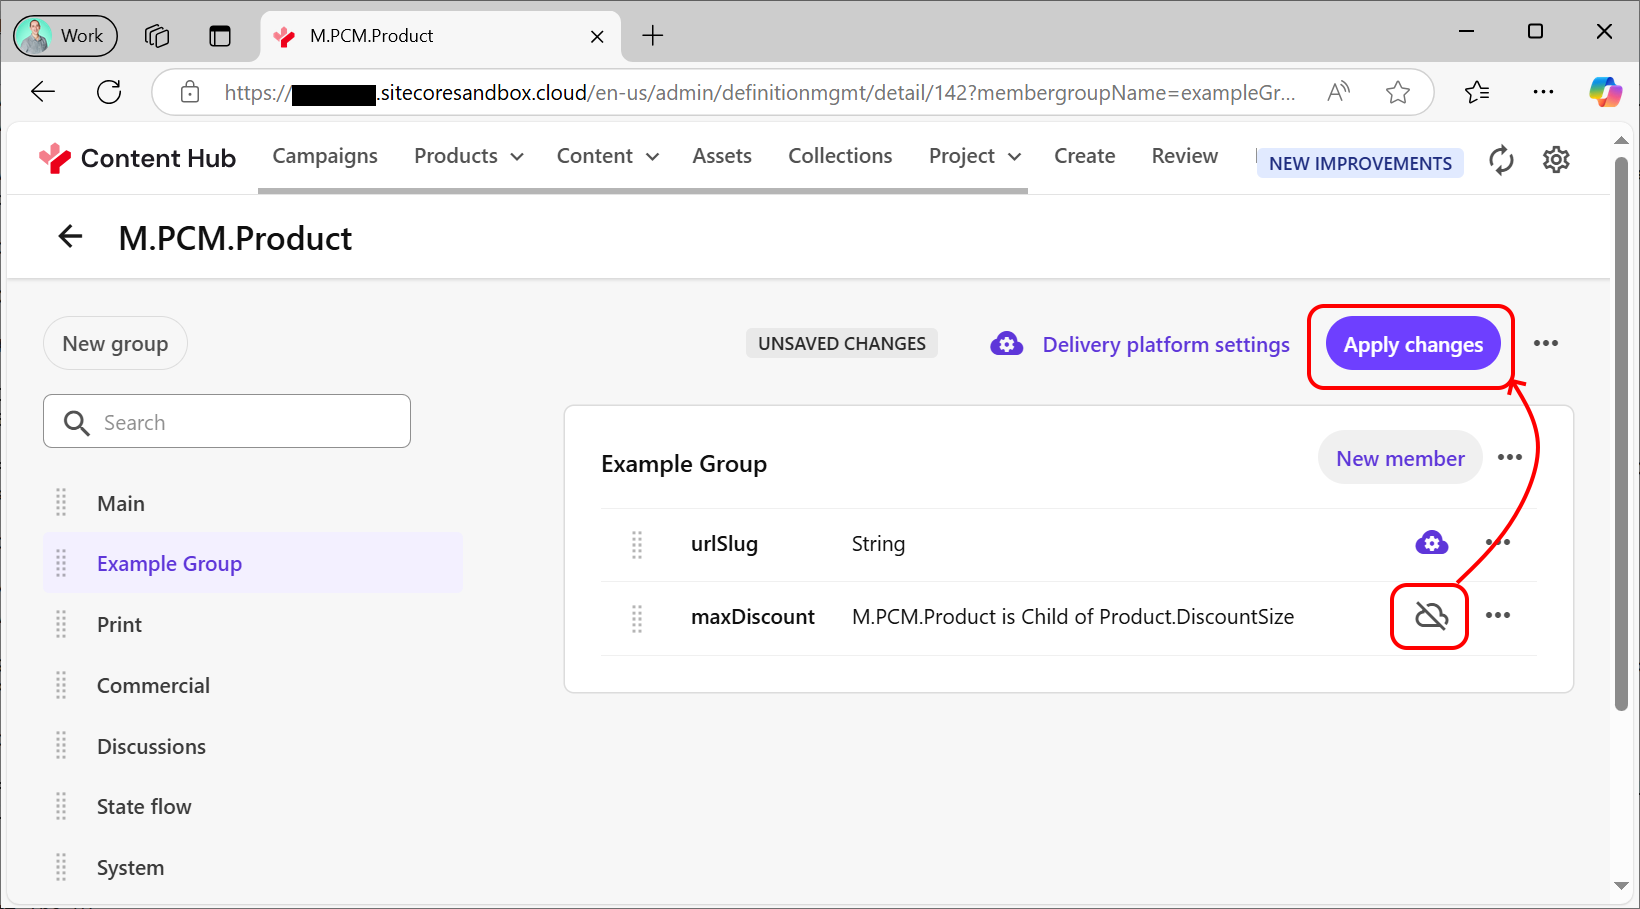
And the grey cloud should turn blue to indicate success.
url copied!
Next, you're going to need API tokens to let your GQL client authenticate with the APIs. These are managed via the settings cog and "API Keys". From here you can create keys for "Delivery" (live) or "Preview" (still being edited - un-cached) data. You'll need at least a preview key, and you have to record it yourself as once created you cannot view keys via this UI. I'll stick to talking about Preview here, but all of this applies to the live API similarly.
I note the examples in the docs use quite short keys of 10 characters or so, but the real ones look something like
si9OdTVJZlpwaFRhQU9ORm9nTlVjTkxBaWhpdjBTaUJCMHkzZ2lD9HgvRT18eXBvLWV4cHQ0ZDRjZTYxZb==
instead.
Next you'll need a GraphQL tool. There is an integrated "playground" UI included at
https://your-domain.sitecoresandbox.cloud/api/graphql/preview/ide/
for the preview API (and live too, without the
preview/
bit of the URL) but I found the UI a bit buggy here - it failed to close the pop-up auto-complete windows properly which made the screen fairly unusable after a while. Not sure why that was, but I went back to using Postman because of this.
Whichever tool you're using you'll need to target the correct query API, which is
https://your-domain.sitecoresandbox.cloud/api/graphql/preview/v1
for preview. And you'll need to supply your key. Whichever tool you're using, you're passing an HTTP header which is named
X-GQL-Token. For the built-in playground you need to find the "HTTP HEADERS" tab at the bottom left of the window and paste in the header data as JSON:
{
  "X-GQL-Token":" -- your value here --"
}
If you're using a more structured tool like Postman then you need to set Authorisation Type to "API Key" and then add the key as above to the headers.
And then you can run a query. You're querying the
allM_PCM_Product
set of entities, and can fetch back fields as required:
{
    allM_PCM_Product {
        results {
            id
            productName
            productLabel
            maxDiscount { id }
            urlSlug
            productShortDescription
        }
    }
}
Note that relationship-type taxonomy fields need you to specify you want the related ID (or other fields) returned in your query, but simple fields only require you to specify their name. For example, you'd get a query error if you specified only
maxDiscount
here rather than
maxDiscount { id }.
But once that's right you'll get back data:
{
    "data": {
        "allM_PCM_Product": {
            "results": [
                {
                    "id": "5Iq0CYSFQNy12sDHkJRnhg",
                    "productName": "D47087",
                    "productLabel": {
                        "en-US": "Timber Balance Bench with Hooks on One End - 11ft"
                    },
                    "maxDiscount": {
                        "id": "Product.DiscountSize.25"
                    },
                    "urlSlug": "/timber-balance-bench",
                    "productShortDescription": {
                        "en-US": "The Niels Larsen traditional balance bench is crafted in the UK using only timber from sustainable sources that is all FSC or PEFC certified. "
                    }
                }

                ...  snip ...
            ]
        }
    }
}
url copied!
By default the renditions generated by Content Hub are authenticated resources. Your users can download them, but they're not optimised for serving to the internet generally. Public Links are what Content Hub calls the process of pushing and image to its CDN and giving you a link that's safe for internet use.
You can manually create Public Links from the Asset pages, but for managing product images that's probably not the right approach. Ideally this would be automated so that whenever an editor adds images for a Product these become public so that GraphQL queries from your web front-end can get both the right copy and the correct image URL.
And automating these is achievable - though it's a bit more technical than the customisations above. Content Hub has an events framework you can access via the "Triggers" tile under the system settings cog. From here you can bind bits of code to events raised while users work.
If you click "New trigger" from the Triggers page you can specify the details of an event you want handled. There are three pages here to set up. The first specifies some base details, where the important parts are the "Objective" and "Execution type" fields:
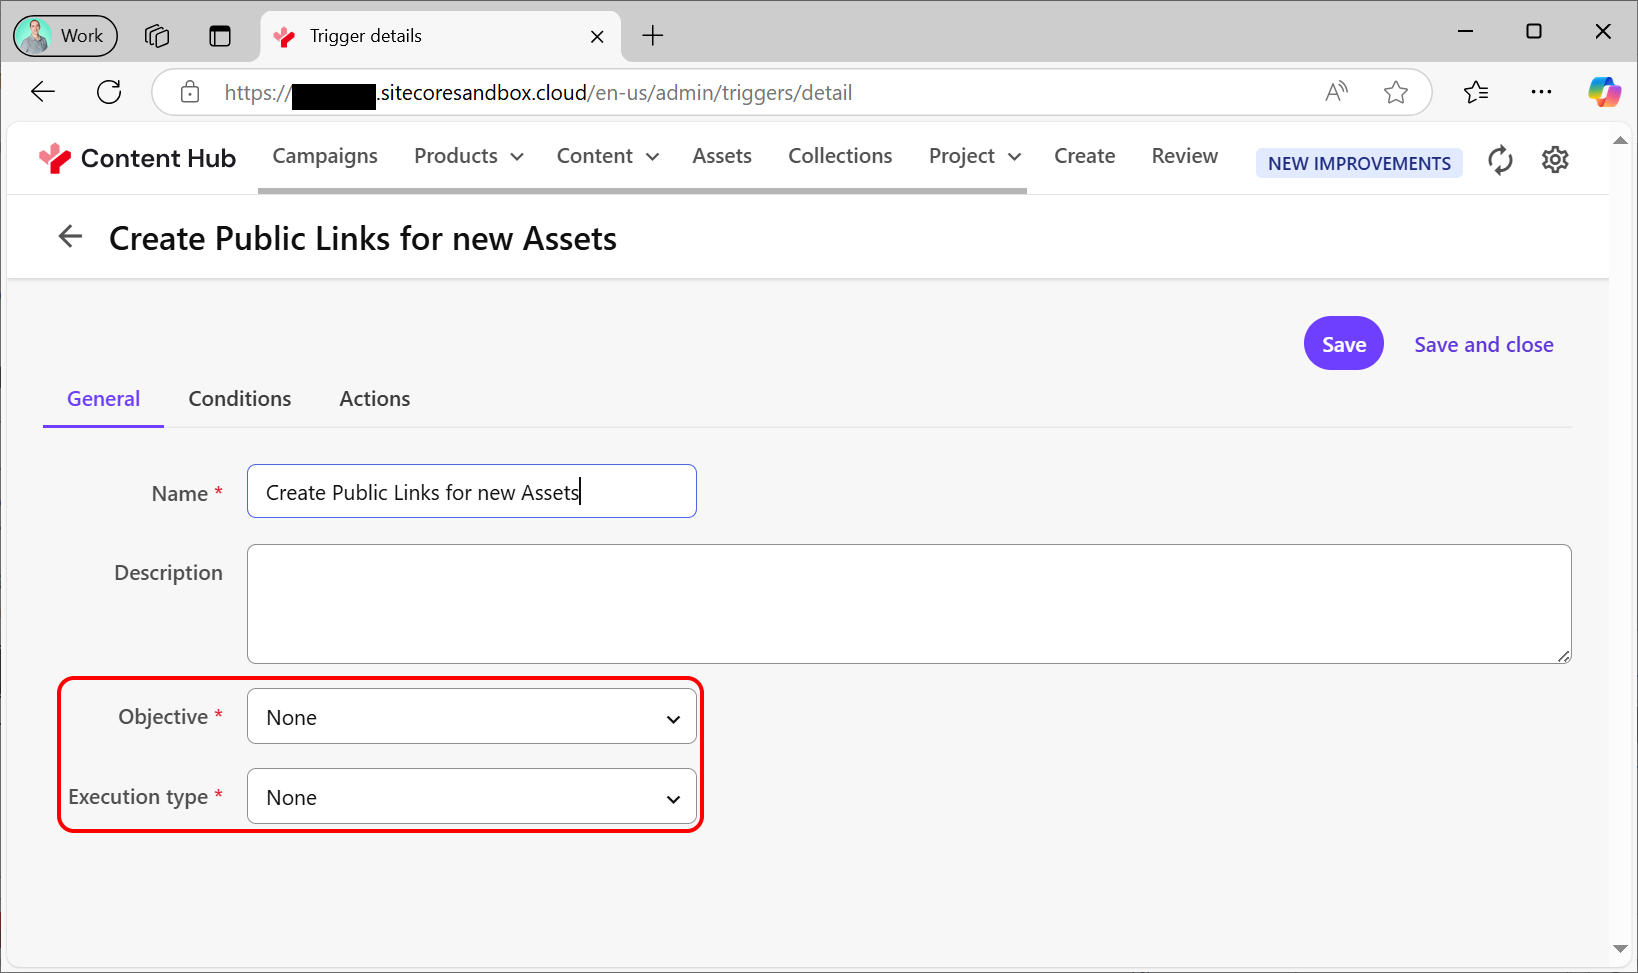
Objectives are the events that cause a trigger to run. You can create one or more of Creation, Modification or Deletion here - and creation is appropriate to this scenario. Execution type controls whether the event is handled synchronously or asynchronously. For anything involving image processing and pushing data to a 3rd party you should go async here, so "In background" is the right answer.
For the conditions tab you specify rules that control what subset of the basic event will cause this trigger to be executed. You have to specify something here - and "the asset doesn't already have any public links" is a likely sounding rule. You click "Add definition" to specify the sort of entity your rule operates on, and then give one or more conditions for properties of that entity. So in this case:
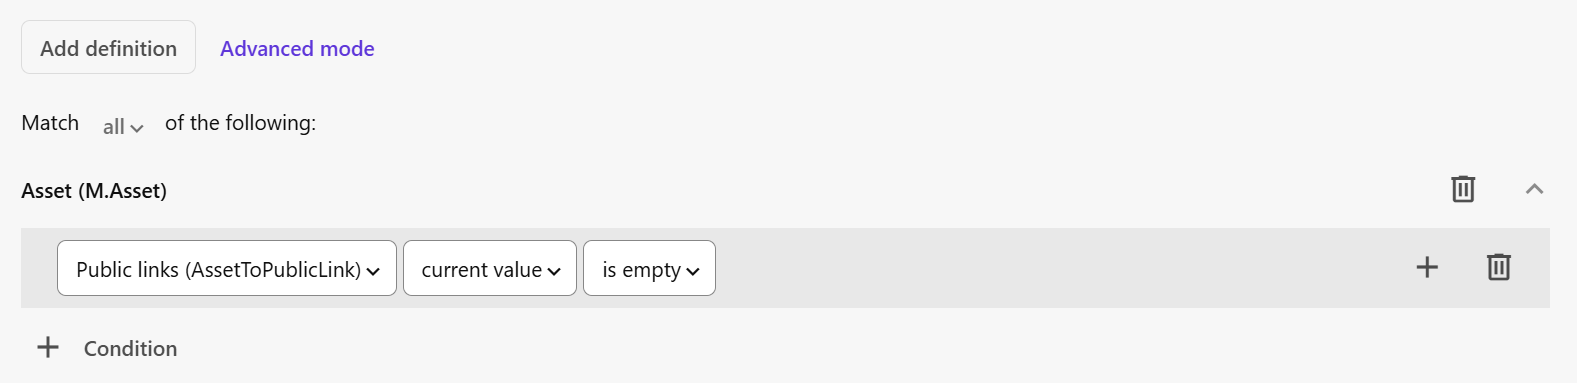
On
M.Asset
the rule checks if the
AssetToPublicLink
relationship has any relations defined.
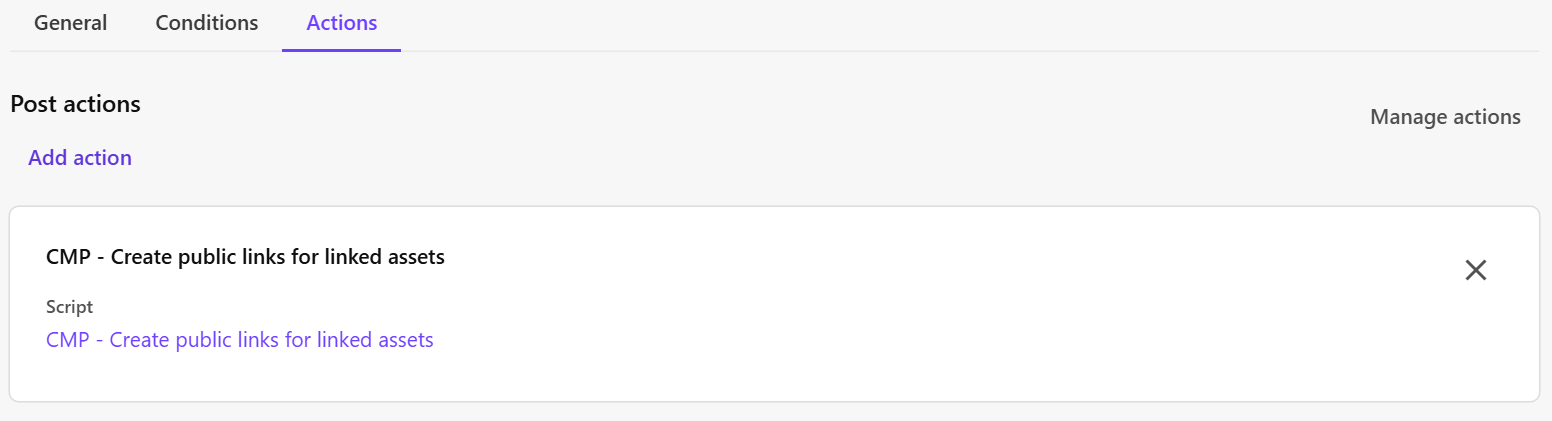
Finally the "Actions" tab says what should happen if this rule triggers. You're basically selecting C# scripts here, and helpfully Sitecore provide an OTB one which is pretty close to what's needed here. The "CMP - Create public links for linked assets" action will work for a first pass:
However in real code you'd probably add a custom Action script with some of this code tweaked...
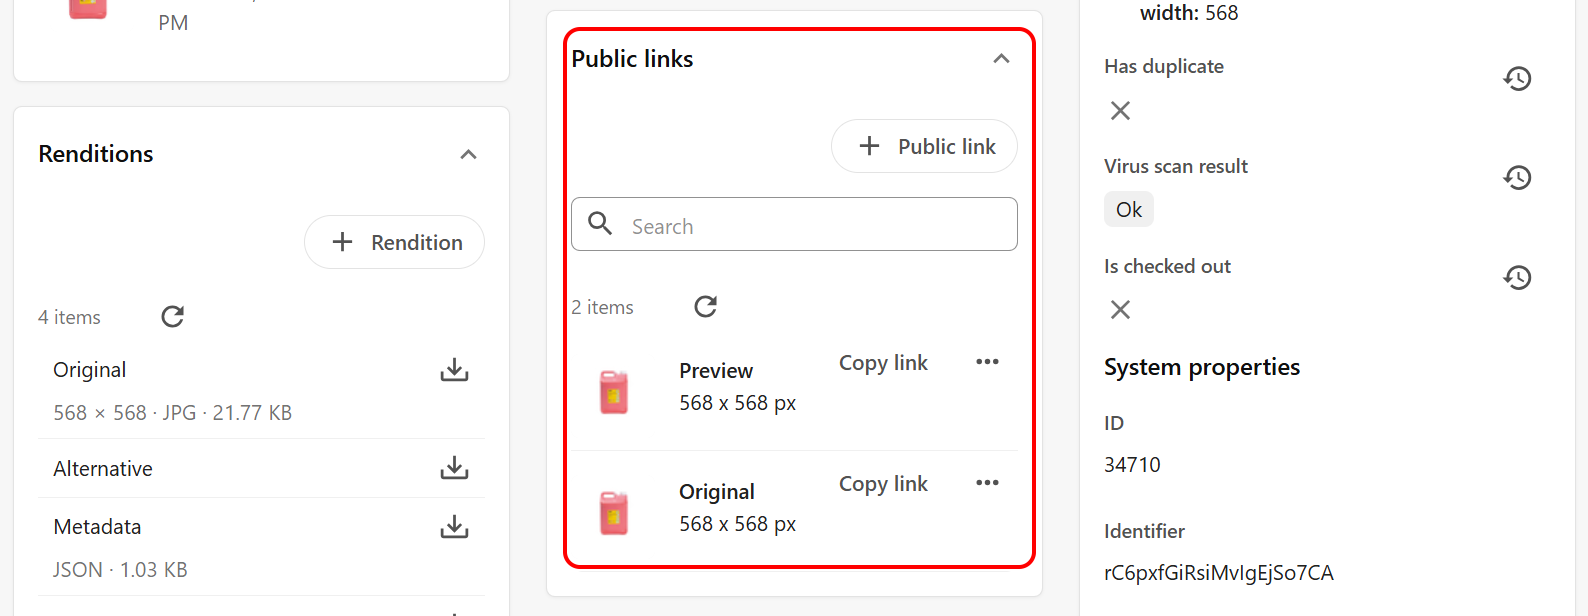
With those changes saved, if you create a product and upload a new image for it, drilling down to the image's Asset page you'll now see some options populated in the Public Links region of the page:
But what did it create links to here? Well if you go to via the system cog to the "Scripts" tile you can open the code provided, which looks like:
using System.Linq;
using System.Threading.Tasks;

var assetId = Context.TargetId;

// Check if public links don't exist yet
var query = Query.CreateQuery(entities => from e in entities
                                            where e.DefinitionName == "M.PublicLink"
                                            && e.Parent("AssetToPublicLink") == assetId.Value
                                            && (e.Property("Resource") == "preview" || e.Property("Resource") == "downloadOriginal")
                                            && e.Property("IsDisabled") == false
                                            select e);
query.Take = 1;

var result = await MClient.Querying.QueryIdsAsync(query);
if (result.TotalNumberOfResults > 0)
{
    MClient.Logger.Info("Public links already exist for asset with id '" + assetId + "'");
    return;
}

// Create public links
await CreateForRendition("preview", assetId.Value);
MClient.Logger.Info("Created public link 'preview' for asset with id '" + assetId + "'");

await CreateForRendition("downloadOriginal", assetId.Value);
MClient.Logger.Info("Created public link 'downloadOriginal' for asset with id '" + assetId + "'");

... snip ...
The two highlighted lines here are doing the work - calling
CreateForRendition
on the "preview" and "downloadOriginal" renditions of our asset. I've left out that function itself, but it's just a wrapper around the more verbose API calls to achieve "make a link to a specific rendition of this asset".
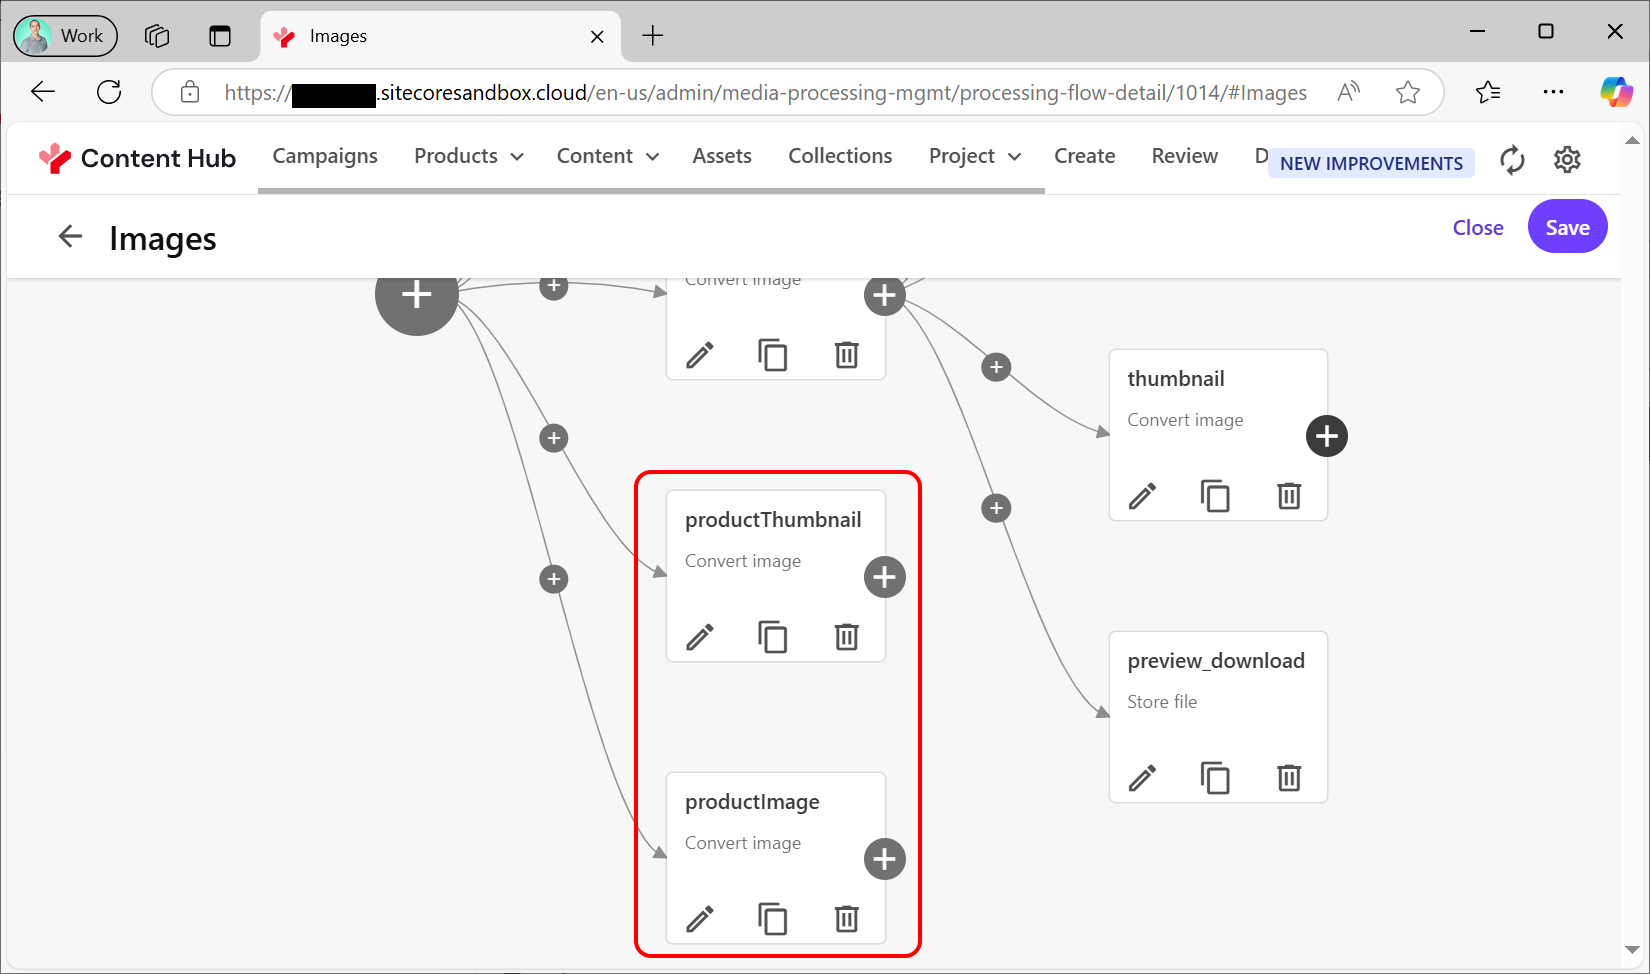
So if you want to customise what rendition(s) you get public links for automatically, then you need to do three things:
So you might set up renditions for:
productThumbnail
- at 200px x 200pxproductImage
at 1024px x 1024px both rendered to
webp
format. That's all set up under the "Media Processing" config for image-type content:
The config here can be a bit tricky to get right. For each of those renditions you need to add a "Convert Image" node to the graph. The properties for that node have settings for the core parameters and the output. The Parameters tab has a load of settings for the transform you want to make to the base image:
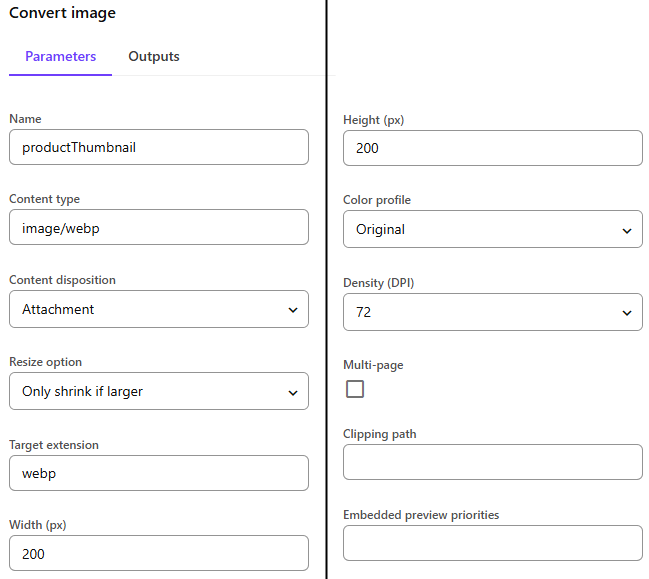
Name is what's displayed on the node in the diagram. The content type and target extensions define what you want to render the image out as, and the Height/Width / Colour Profile and Density set the size and structure you want. Resize option lets you decide how and when resize is performed. And Content Disposition lets you specify that the rendition should be attached to the asset.
The Outputs tab sets some further details about saving the data. You need to enable the "Store output" option.
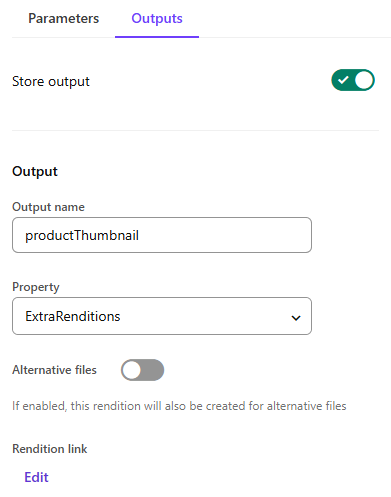
The Output name is what we'll reference this from the script above which creates the Public Links. And the oddly named "Property" field specifies which segment of the Renditions this is saved too. But the key point seems to be that you have to add a Rendition Link here. And that has a further set of fields:
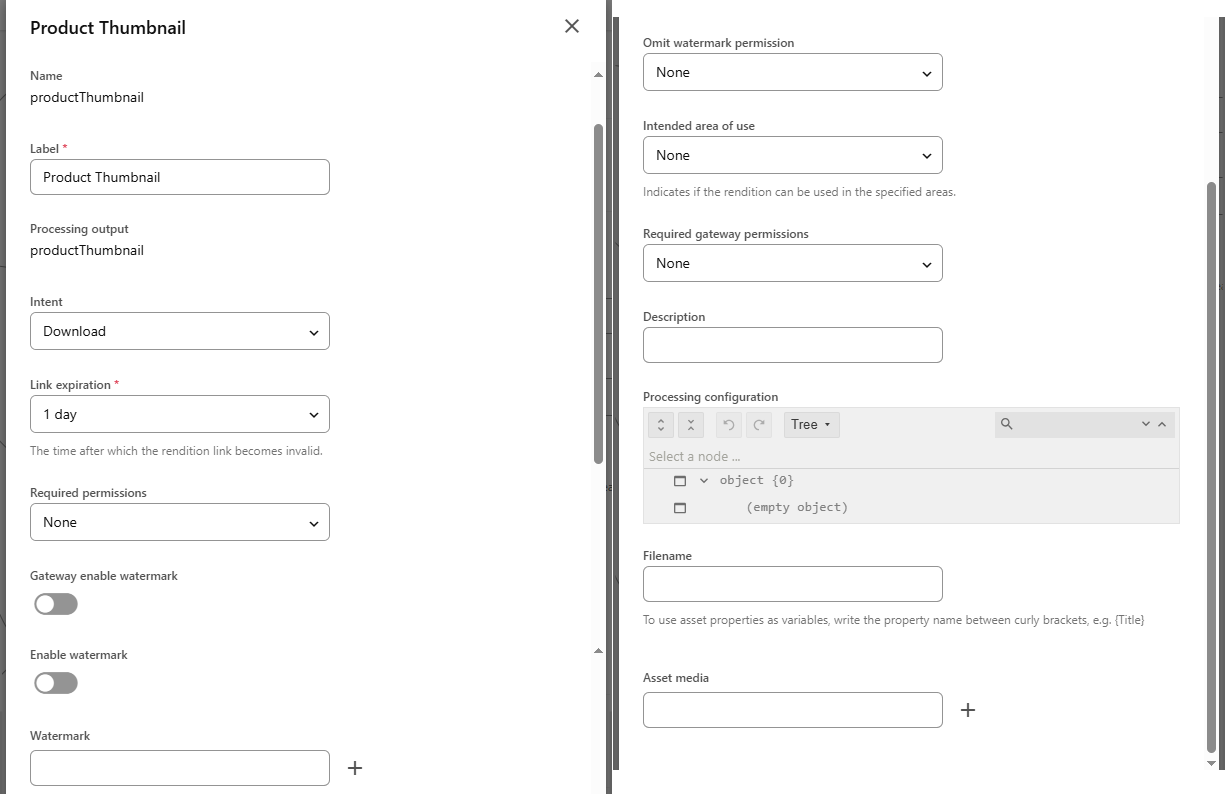
It doesn't seem to make a lot of difference what you set here - just that this has been set.
Once all that's been saved, you can (copy and) update the script to reference these renditions.
And now when you upload a new image it will get correctly sized public links automatically as the ingestion processing completes.
url copied!
With that data in place we can now add a bit to the GraphQL to return these public link URLs too:
{
    allM_PCM_Product {
        results {
            id
            productName
            productLabel
            maxDiscount { id }
            urlSlug
            productShortDescription
            pCMProductToAsset {
                results {
                    fileName
                    urls
                }
            }
        }
    }
}
The
productShortDescription
relation connects this product to its assets, so fetching the
results
for that allows us to get the filename and public urls for each asset. And with that in place, you now get the URLs in the response data:
{
    "data": {
        "allM_PCM_Product": {
            "results": [
                {
                    "id": "07r4dKcNQNeE1ev0hWx5oA",
                    "productName": "737283",
                    "productLabel": {
                        "en-US": "Ready Mixed Paint 5L - Red"
                    },
                    "maxDiscount": {
                        "id": "Product.DiscountSize.75"
                    },
                    "urlSlug": "/red-paint",
                    "productShortDescription": {
                        "en-US": null
                    },
                    "pCMProductToAsset": {
                        "results": [
                            {
                                "fileName": "737283.jpg",
                                "urls": {
                                    "e9f1fab383dd4c2da40538f8288f564a": {
                                        "url": "https://your-domain.sitecoresandbox.cloud/api/public/content/e9f1fab383dd4c2da40538f8288f564a?v=0e589b71",
                                        "expiredOn": null,
                                        "resource": "productThumbnail",
                                        "metadata": null
                                    },
                                    "57f66d6fcdff4abca4b39263a232aa35": {
                                        "url": "https://your-domain.sitecoresandbox.cloud/api/public/content/57f66d6fcdff4abca4b39263a232aa35?v=21037169",
                                        "expiredOn": null,
                                        "resource": "productImage",
                                        "metadata": null
                                    }
                                }
                            }
                        ]
                    }
                },

                ... snip ...
            ]
        }
    }
}
So your front-end can now render any data you want about your products...
url copied!
So it took quite a lot of writing, but the setup required to get custom product data for your website out of Content Hub isn't too complex.
↑ Back to top
